> ## Documentation Index
> Fetch the complete documentation index at: https://docs.crewai.com/llms.txt
> Use this file to discover all available pages before exploring further.
# Custom MCP Servers
> Connect your own MCP servers to CrewAI AMP with public access, API key authentication, or OAuth 2.0
CrewAI AMP supports connecting to any MCP server that implements the [Model Context Protocol](https://modelcontextprotocol.io/). You can bring public servers that require no authentication, servers protected by an API key or bearer token, and servers that use OAuth 2.0 for secure delegated access.
## Prerequisites
You need an active [CrewAI AMP](https://app.crewai.com) account.
The URL of the MCP server you want to connect. The server must be accessible from the internet and support Streamable HTTP transport.
## Adding a Custom MCP Server
Navigate to **Tools & Integrations** in the left sidebar of CrewAI AMP, then select the **Connections** tab.
Click the **Add Custom MCP Server** button. A dialog will appear with the configuration form.
* **Name** (required): A descriptive name for your MCP server (e.g., "My Internal Tools Server").
* **Description**: An optional summary of what this MCP server provides.
* **Server URL** (required): The full URL to your MCP server endpoint (e.g., `https://my-server.example.com/mcp`).
Select one of the three available authentication methods based on how your MCP server is secured. See the sections below for details on each method.
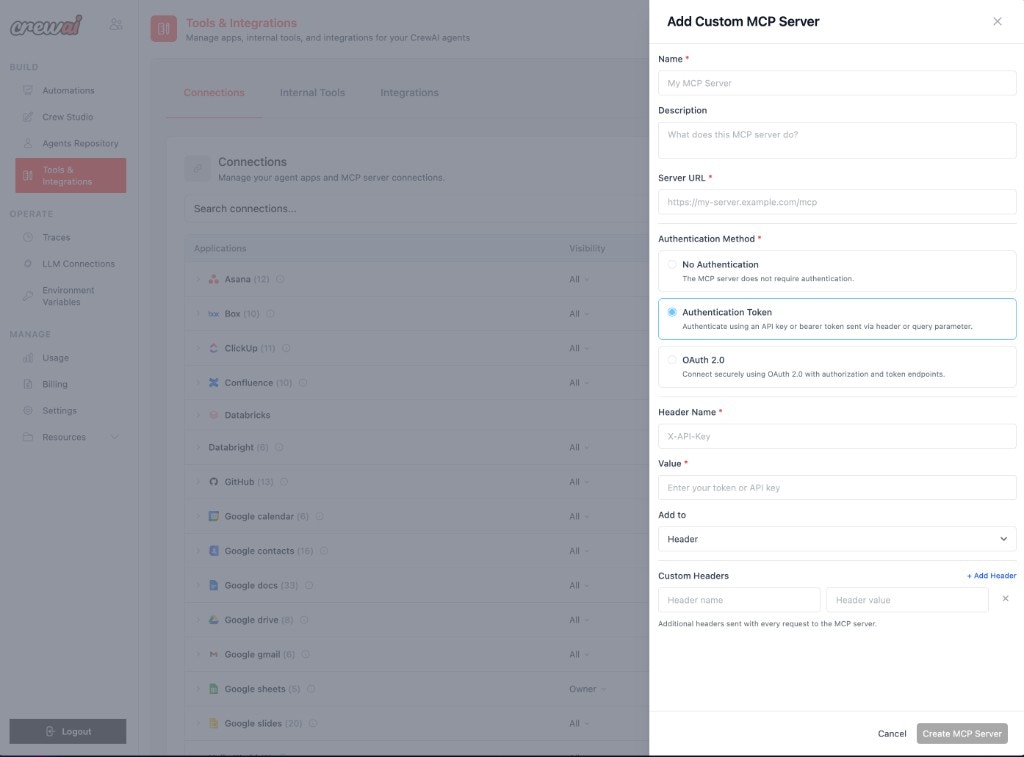
If your MCP server requires additional headers on every request (e.g., tenant identifiers or routing headers), click **+ Add Header** and provide the header name and value. You can add multiple custom headers.
Click **Create MCP Server** to save the connection. Your custom MCP server will now appear in the Connections list and its tools will be available for use in your crews.
## Authentication Methods
### No Authentication
Choose this option when your MCP server is publicly accessible and does not require any credentials. This is common for open-source or internal servers running behind a VPN.
### Authentication Token
Use this method when your MCP server is protected by an API key or bearer token.
 | Field | Required | Description |
| --------------- | -------- | ---------------------------------------------------------------------------------------- |
| **Header Name** | Yes | The name of the HTTP header that carries the token (e.g., `X-API-Key`, `Authorization`). |
| **Value** | Yes | Your API key or bearer token. |
| **Add to** | No | Where to attach the credential — **Header** (default) or **Query parameter**. |
If your server expects a `Bearer` token in the `Authorization` header, set the Header Name to `Authorization` and the Value to `Bearer `.
### OAuth 2.0
Use this method for MCP servers that require OAuth 2.0 authorization. CrewAI will handle the full OAuth flow, including token refresh.
| Field | Required | Description |
| --------------- | -------- | ---------------------------------------------------------------------------------------- |
| **Header Name** | Yes | The name of the HTTP header that carries the token (e.g., `X-API-Key`, `Authorization`). |
| **Value** | Yes | Your API key or bearer token. |
| **Add to** | No | Where to attach the credential — **Header** (default) or **Query parameter**. |
If your server expects a `Bearer` token in the `Authorization` header, set the Header Name to `Authorization` and the Value to `Bearer `.
### OAuth 2.0
Use this method for MCP servers that require OAuth 2.0 authorization. CrewAI will handle the full OAuth flow, including token refresh.
 | Field | Required | Description |
| -------------------------- | -------- | --------------------------------------------------------------------------------------------------------------------------------------- |
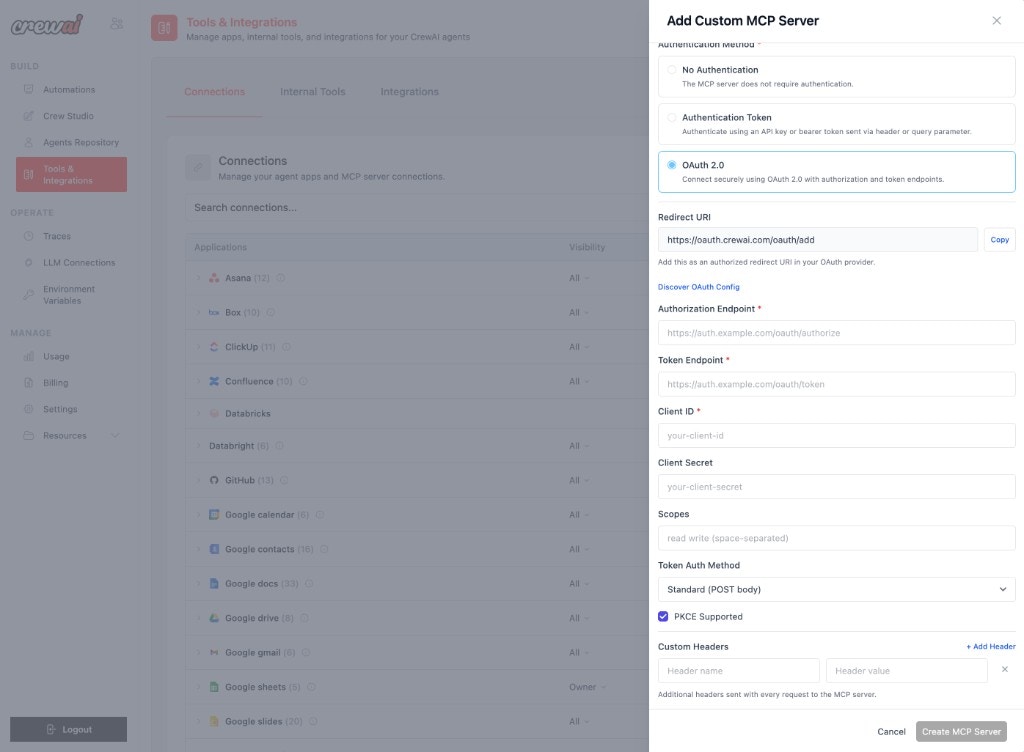
| **Redirect URI** | — | Pre-filled and read-only. Copy this URI and register it as an authorized redirect URI in your OAuth provider. |
| **Authorization Endpoint** | Yes | The URL where users are sent to authorize access (e.g., `https://auth.example.com/oauth/authorize`). |
| **Token Endpoint** | Yes | The URL used to exchange the authorization code for an access token (e.g., `https://auth.example.com/oauth/token`). |
| **Client ID** | Yes | The OAuth client ID issued by your provider. |
| **Client Secret** | No | The OAuth client secret. Not required for public clients using PKCE. |
| **Scopes** | No | Space-separated list of scopes to request (e.g., `read write`). |
| **Token Auth Method** | No | How the client credentials are sent when exchanging tokens — **Standard (POST body)** or **Basic Auth (header)**. Defaults to Standard. |
| **PKCE Supported** | No | Enable if your OAuth provider supports Proof Key for Code Exchange. Recommended for improved security. |
**Discover OAuth Config**: If your OAuth provider supports OpenID Connect Discovery, click the **Discover OAuth Config** link to auto-populate the authorization and token endpoints from the provider's `/.well-known/openid-configuration` URL.
#### Setting Up OAuth 2.0 Step by Step
Copy the **Redirect URI** shown in the form and add it as an authorized redirect URI in your OAuth provider's application settings.
Fill in the **Authorization Endpoint**, **Token Endpoint**, **Client ID**, and optionally the **Client Secret** and **Scopes**.
Select the appropriate **Token Auth Method**. Most providers use the default **Standard (POST body)**. Some older providers require **Basic Auth (header)**.
Check **PKCE Supported** if your provider supports it. PKCE adds an extra layer of security to the authorization code flow and is recommended for all new integrations.
Click **Create MCP Server**. You will be redirected to your OAuth provider to authorize access. Once authorized, CrewAI will store the tokens and automatically refresh them as needed.
## Using Your Custom MCP Server
Once connected, your custom MCP server's tools appear alongside built-in connections on the **Tools & Integrations** page. You can:
* **Assign tools to agents** in your crews just like any other CrewAI tool.
* **Manage visibility** to control which team members can use the server.
* **Edit or remove** the connection at any time from the Connections list.
If your MCP server becomes unreachable or the credentials expire, tool calls using that server will fail. Make sure the server URL is stable and credentials are kept up to date.
Contact our support team for assistance with custom MCP server configuration or troubleshooting.
| Field | Required | Description |
| -------------------------- | -------- | --------------------------------------------------------------------------------------------------------------------------------------- |
| **Redirect URI** | — | Pre-filled and read-only. Copy this URI and register it as an authorized redirect URI in your OAuth provider. |
| **Authorization Endpoint** | Yes | The URL where users are sent to authorize access (e.g., `https://auth.example.com/oauth/authorize`). |
| **Token Endpoint** | Yes | The URL used to exchange the authorization code for an access token (e.g., `https://auth.example.com/oauth/token`). |
| **Client ID** | Yes | The OAuth client ID issued by your provider. |
| **Client Secret** | No | The OAuth client secret. Not required for public clients using PKCE. |
| **Scopes** | No | Space-separated list of scopes to request (e.g., `read write`). |
| **Token Auth Method** | No | How the client credentials are sent when exchanging tokens — **Standard (POST body)** or **Basic Auth (header)**. Defaults to Standard. |
| **PKCE Supported** | No | Enable if your OAuth provider supports Proof Key for Code Exchange. Recommended for improved security. |
**Discover OAuth Config**: If your OAuth provider supports OpenID Connect Discovery, click the **Discover OAuth Config** link to auto-populate the authorization and token endpoints from the provider's `/.well-known/openid-configuration` URL.
#### Setting Up OAuth 2.0 Step by Step
Copy the **Redirect URI** shown in the form and add it as an authorized redirect URI in your OAuth provider's application settings.
Fill in the **Authorization Endpoint**, **Token Endpoint**, **Client ID**, and optionally the **Client Secret** and **Scopes**.
Select the appropriate **Token Auth Method**. Most providers use the default **Standard (POST body)**. Some older providers require **Basic Auth (header)**.
Check **PKCE Supported** if your provider supports it. PKCE adds an extra layer of security to the authorization code flow and is recommended for all new integrations.
Click **Create MCP Server**. You will be redirected to your OAuth provider to authorize access. Once authorized, CrewAI will store the tokens and automatically refresh them as needed.
## Using Your Custom MCP Server
Once connected, your custom MCP server's tools appear alongside built-in connections on the **Tools & Integrations** page. You can:
* **Assign tools to agents** in your crews just like any other CrewAI tool.
* **Manage visibility** to control which team members can use the server.
* **Edit or remove** the connection at any time from the Connections list.
If your MCP server becomes unreachable or the credentials expire, tool calls using that server will fail. Make sure the server URL is stable and credentials are kept up to date.
Contact our support team for assistance with custom MCP server configuration or troubleshooting.