> ## Documentation Index
> Fetch the complete documentation index at: https://docs.crewai.com/llms.txt
> Use this file to discover all available pages before exploring further.
# Enable Crew Studio
> Enabling Crew Studio on CrewAI AMP
Crew Studio is a powerful **no-code/low-code** tool that allows you to quickly
scaffold or build Crews through a conversational interface.
## What is Crew Studio?
Crew Studio is an innovative way to create AI agent crews without writing code.
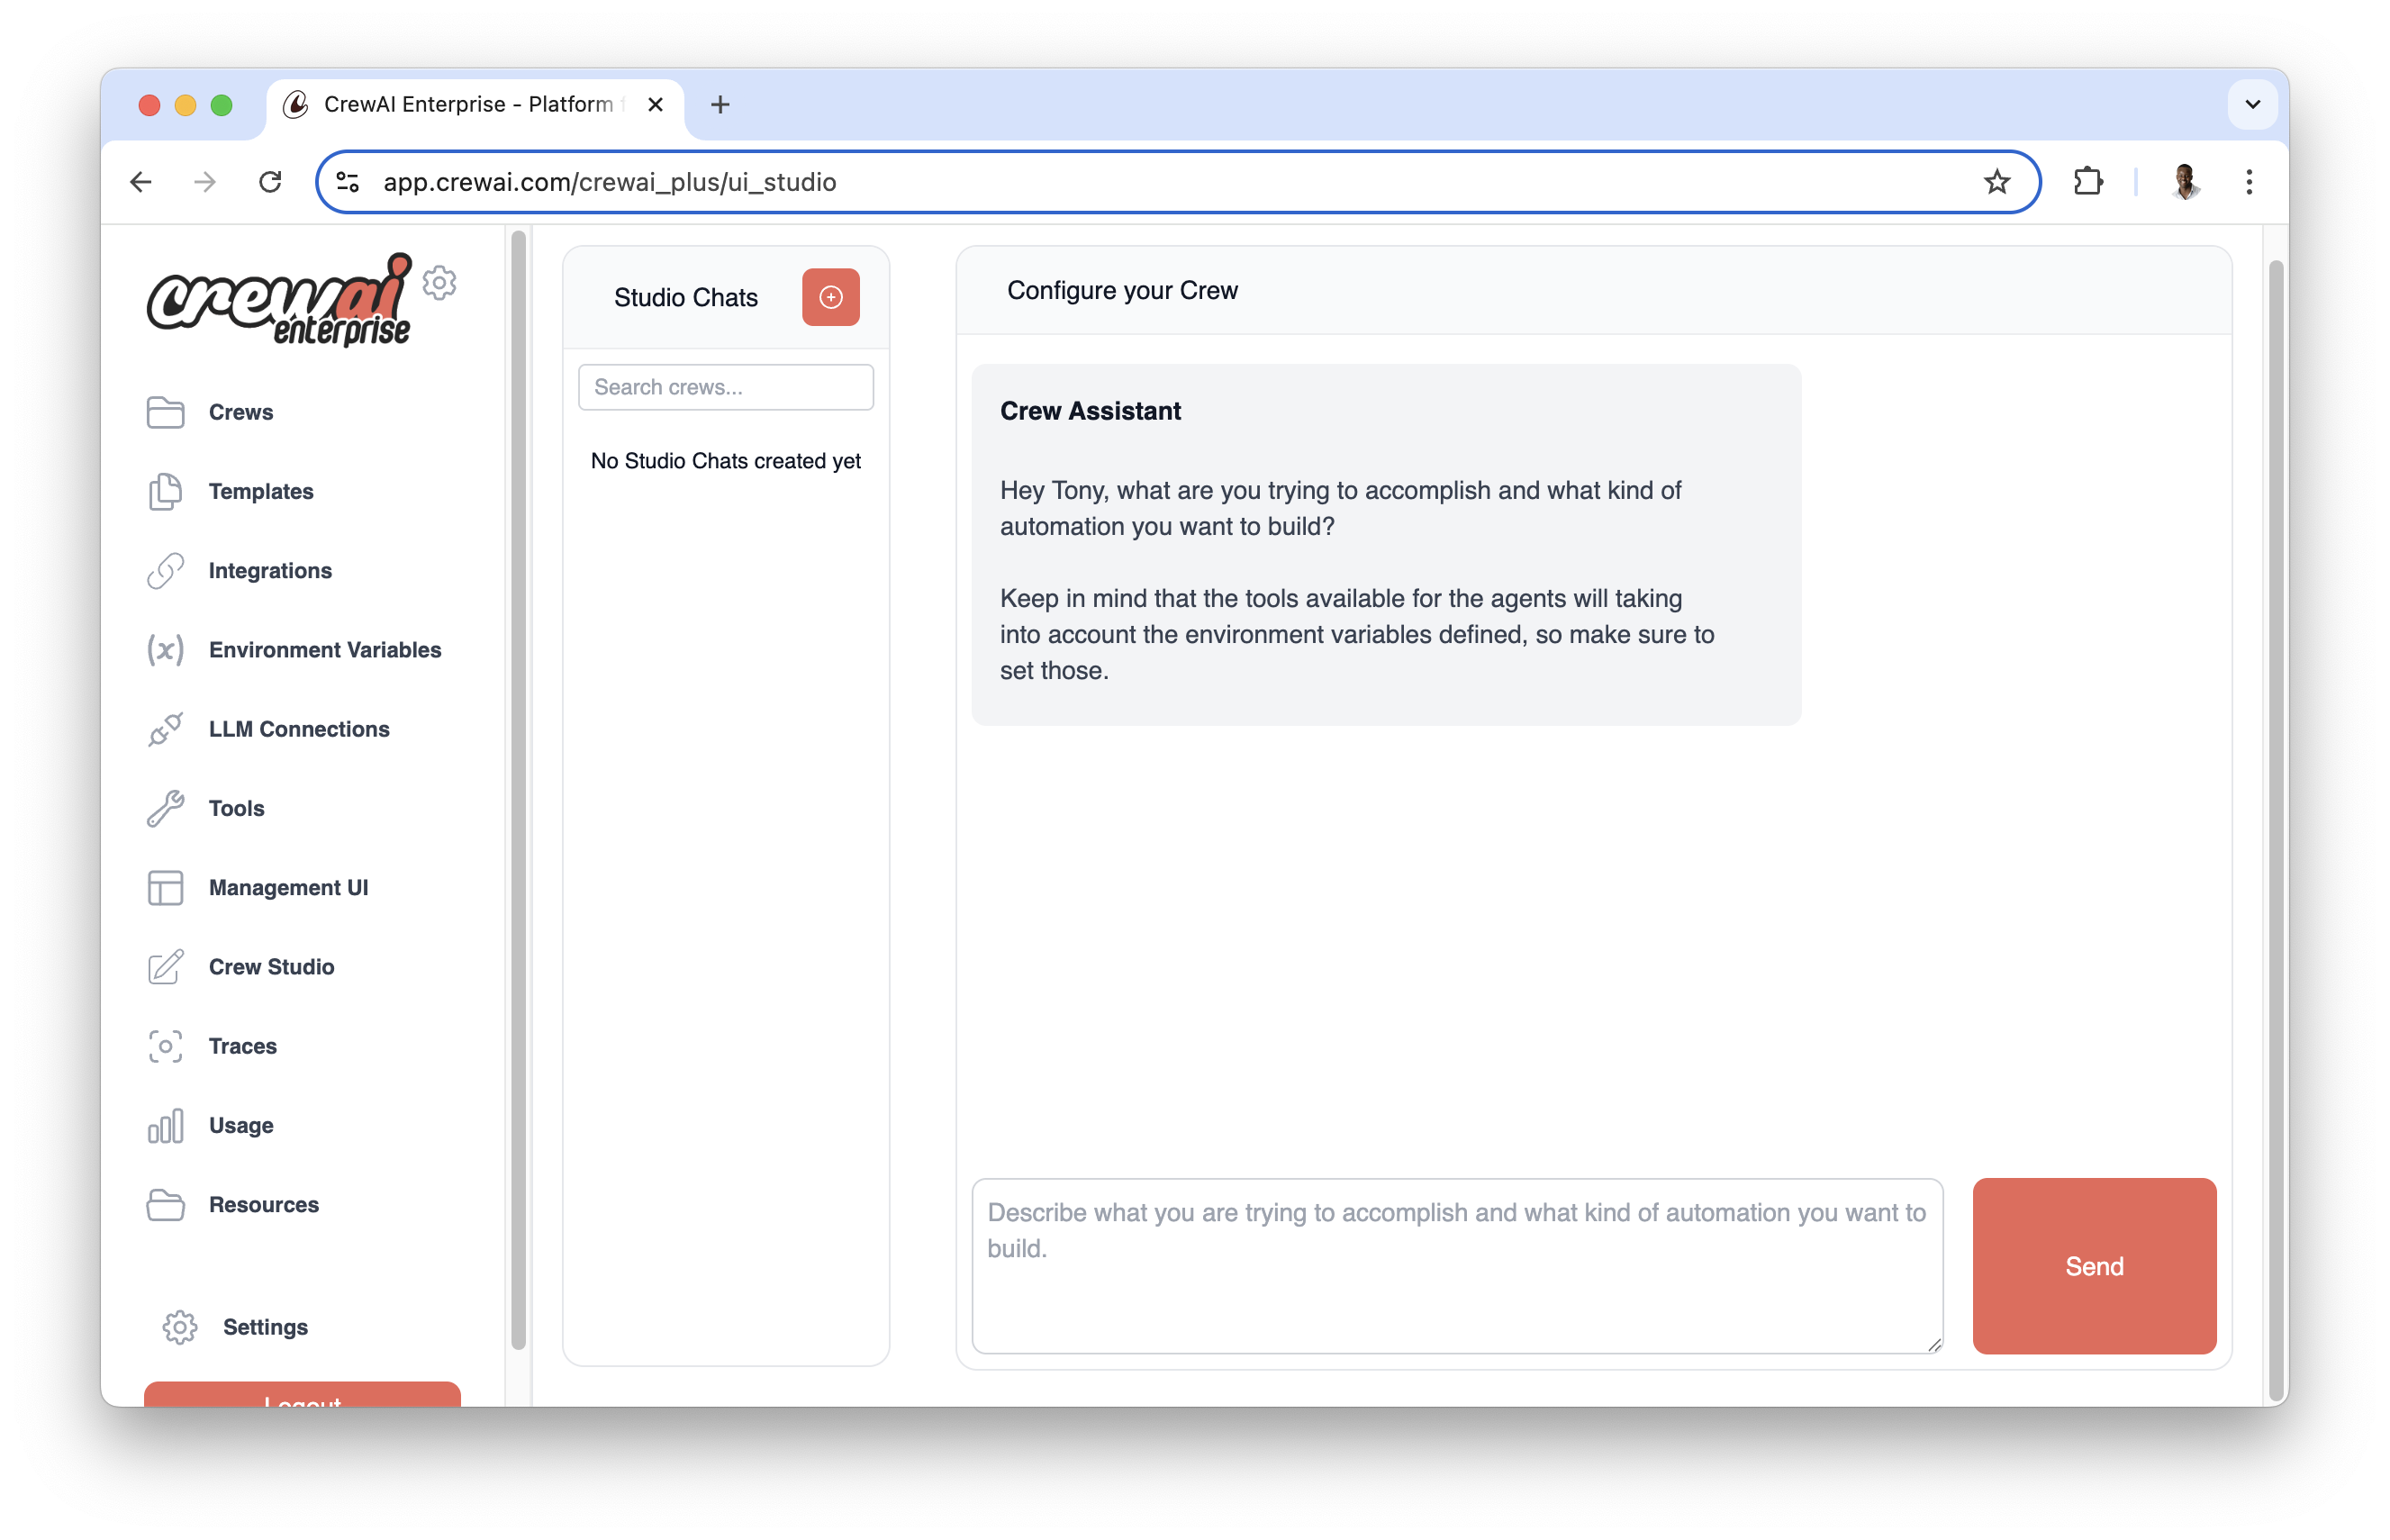 With Crew Studio, you can:
* Chat with the Crew Assistant to describe your problem
* Automatically generate agents and tasks
* Select appropriate tools
* Configure necessary inputs
* Generate downloadable code for customization
* Deploy directly to the CrewAI AMP platform
## Configuration Steps
Before you can start using Crew Studio, you need to configure your LLM connections:
Go to the **LLM Connections** tab in your CrewAI AMP dashboard and create a new LLM connection.
Feel free to use any LLM provider you want that is supported by CrewAI.
Configure your LLM connection:
* Enter a `Connection Name` (e.g., `OpenAI`)
* Select your model provider: `openai` or `azure`
* Select models you'd like to use in your Studio-generated Crews
* We recommend at least `gpt-4o`, `o1-mini`, and `gpt-4o-mini`
* Add your API key as an environment variable:
* For OpenAI: Add `OPENAI_API_KEY` with your API key
* For Azure OpenAI: Refer to [this article](https://blog.crewai.com/configuring-azure-openai-with-crewai-a-comprehensive-guide/) for configuration details
* Click `Add Connection` to save your configuration
With Crew Studio, you can:
* Chat with the Crew Assistant to describe your problem
* Automatically generate agents and tasks
* Select appropriate tools
* Configure necessary inputs
* Generate downloadable code for customization
* Deploy directly to the CrewAI AMP platform
## Configuration Steps
Before you can start using Crew Studio, you need to configure your LLM connections:
Go to the **LLM Connections** tab in your CrewAI AMP dashboard and create a new LLM connection.
Feel free to use any LLM provider you want that is supported by CrewAI.
Configure your LLM connection:
* Enter a `Connection Name` (e.g., `OpenAI`)
* Select your model provider: `openai` or `azure`
* Select models you'd like to use in your Studio-generated Crews
* We recommend at least `gpt-4o`, `o1-mini`, and `gpt-4o-mini`
* Add your API key as an environment variable:
* For OpenAI: Add `OPENAI_API_KEY` with your API key
* For Azure OpenAI: Refer to [this article](https://blog.crewai.com/configuring-azure-openai-with-crewai-a-comprehensive-guide/) for configuration details
* Click `Add Connection` to save your configuration
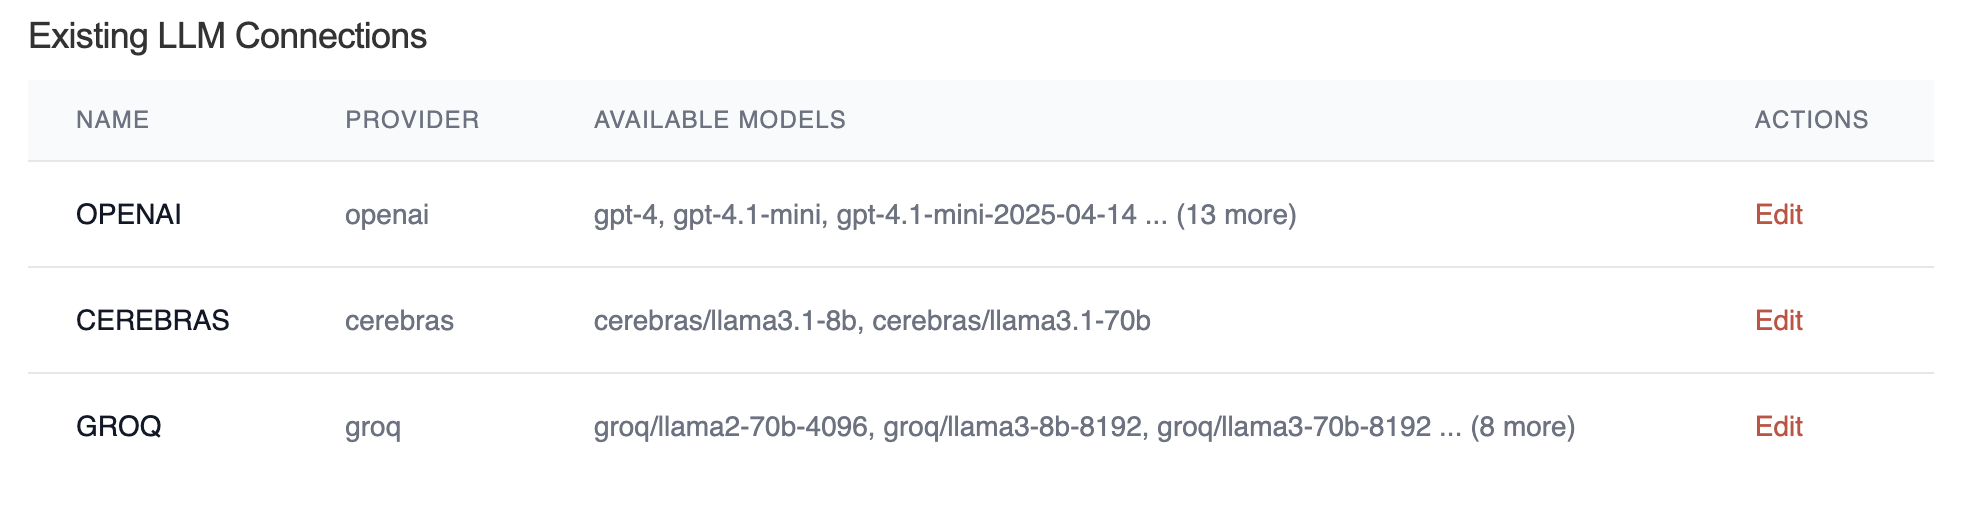
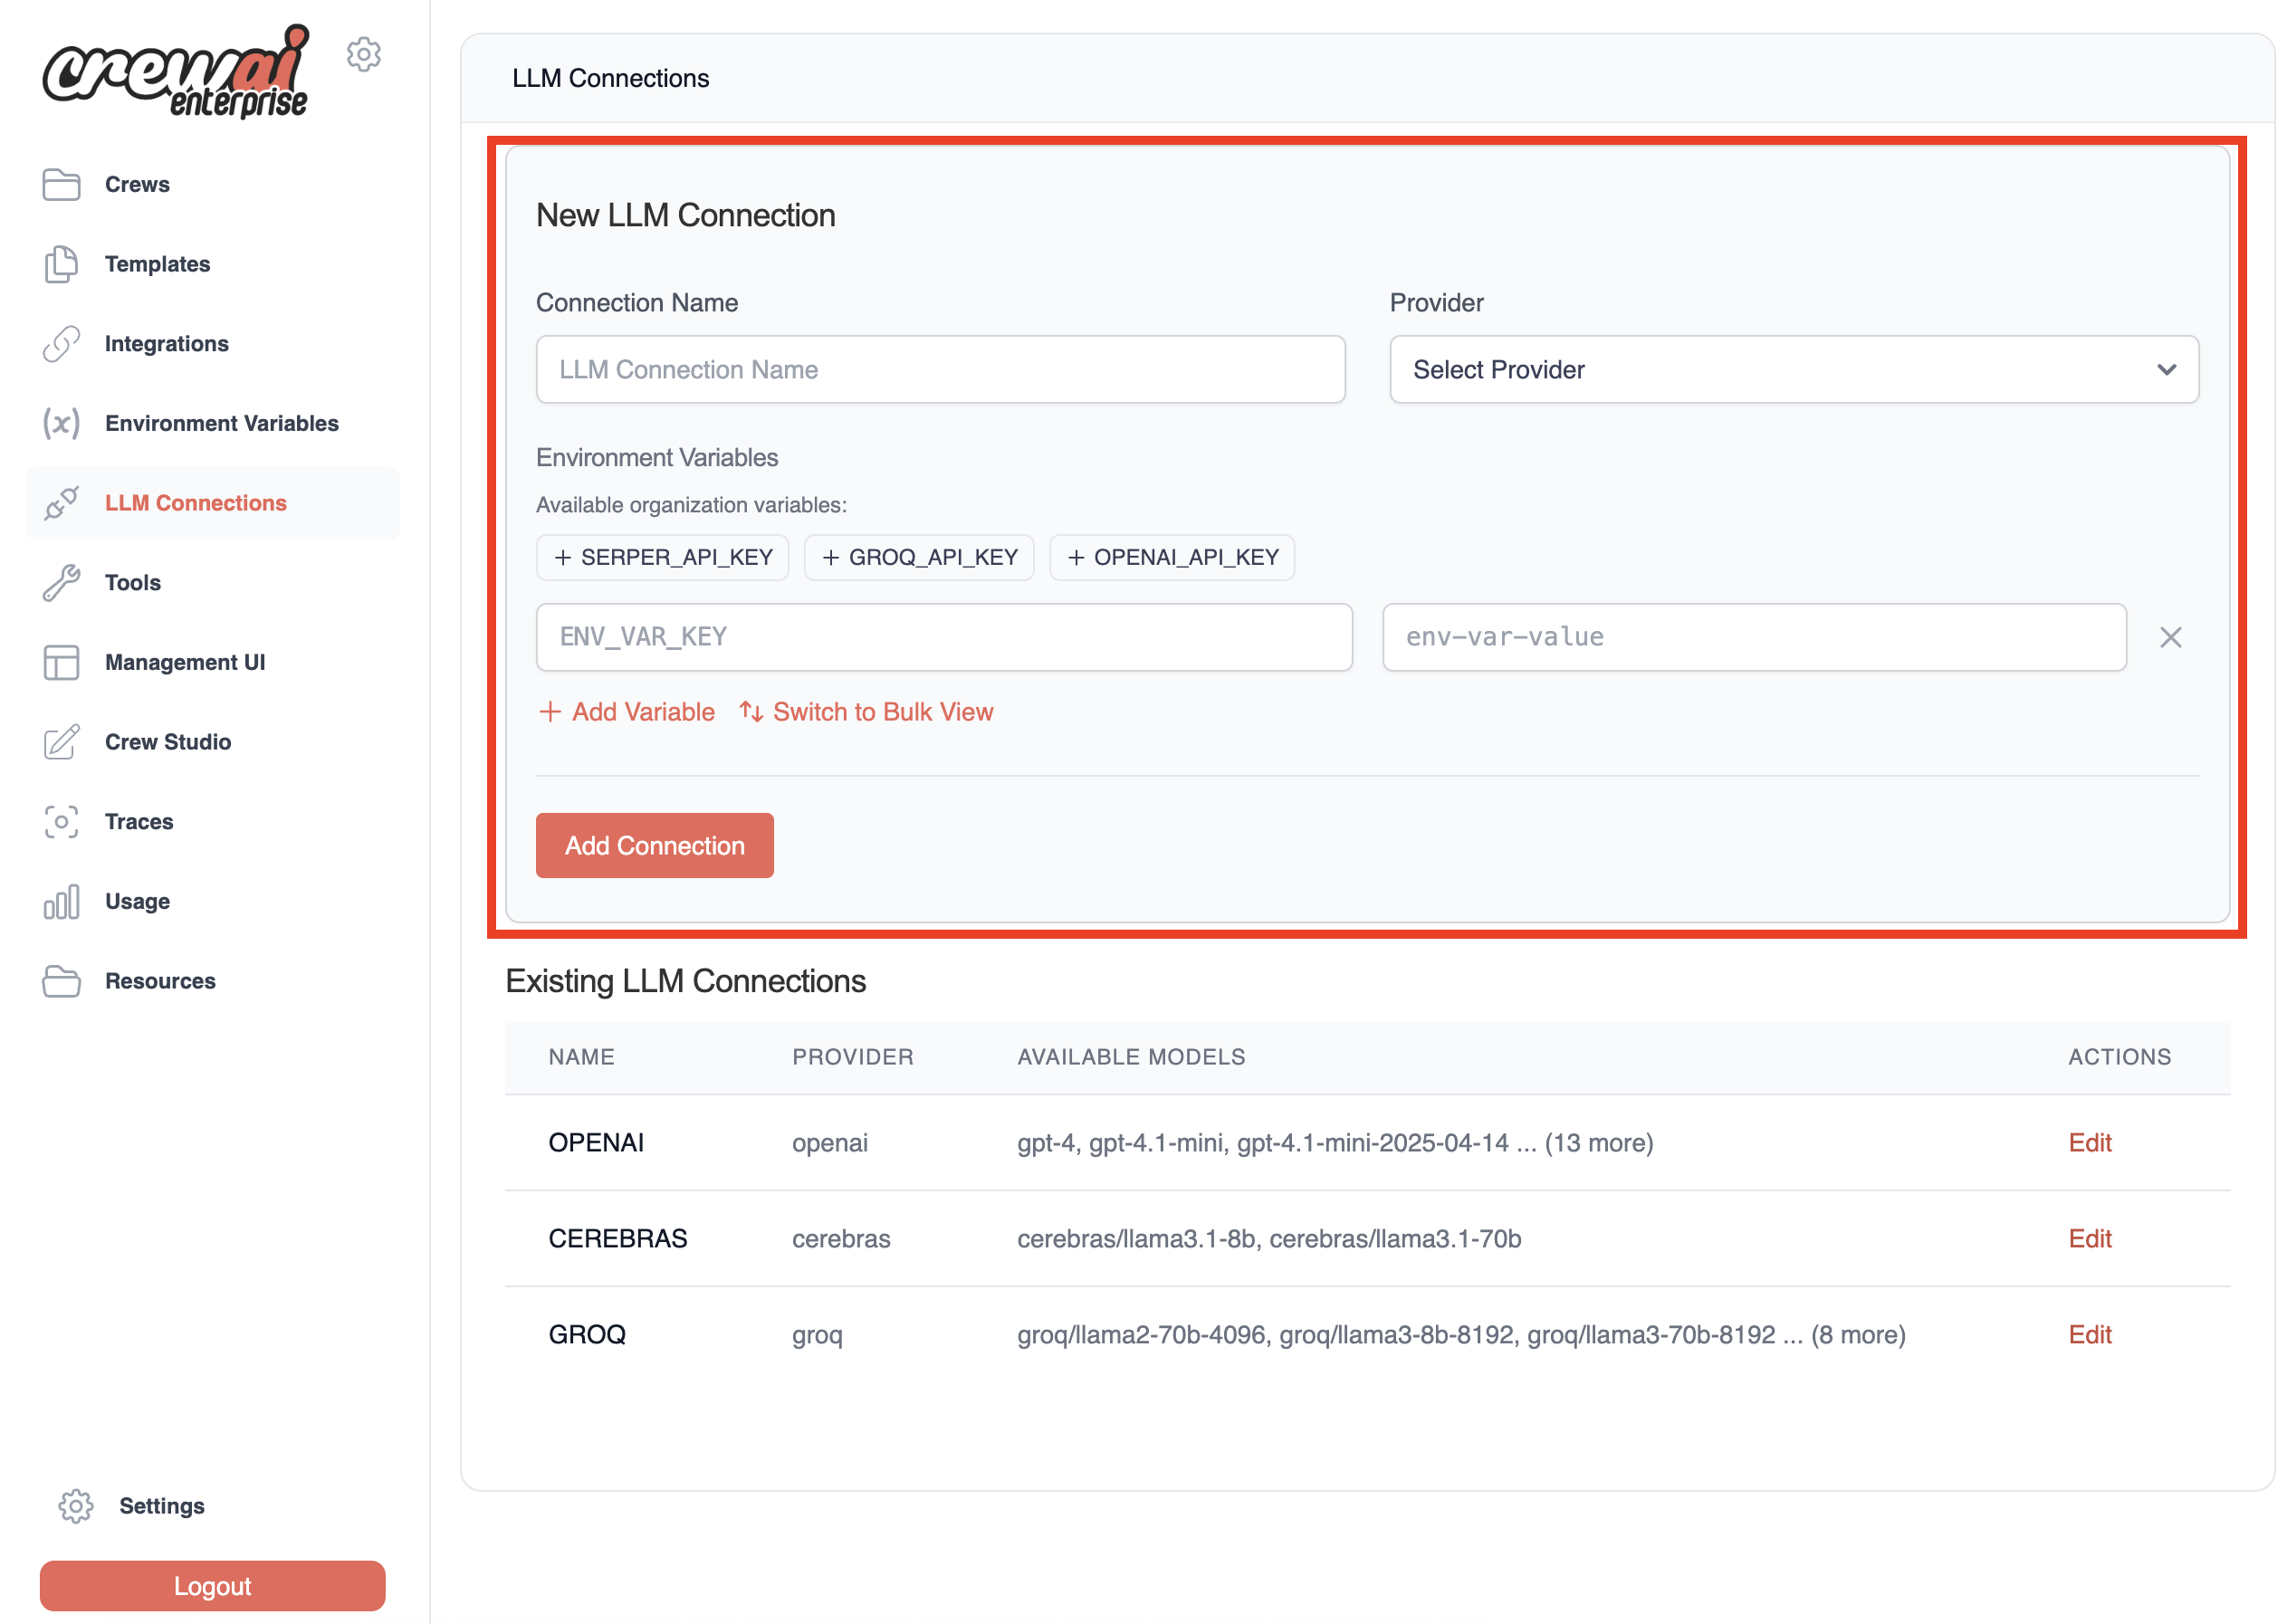 Once you complete the setup, you'll see your new connection added to the list of available connections.
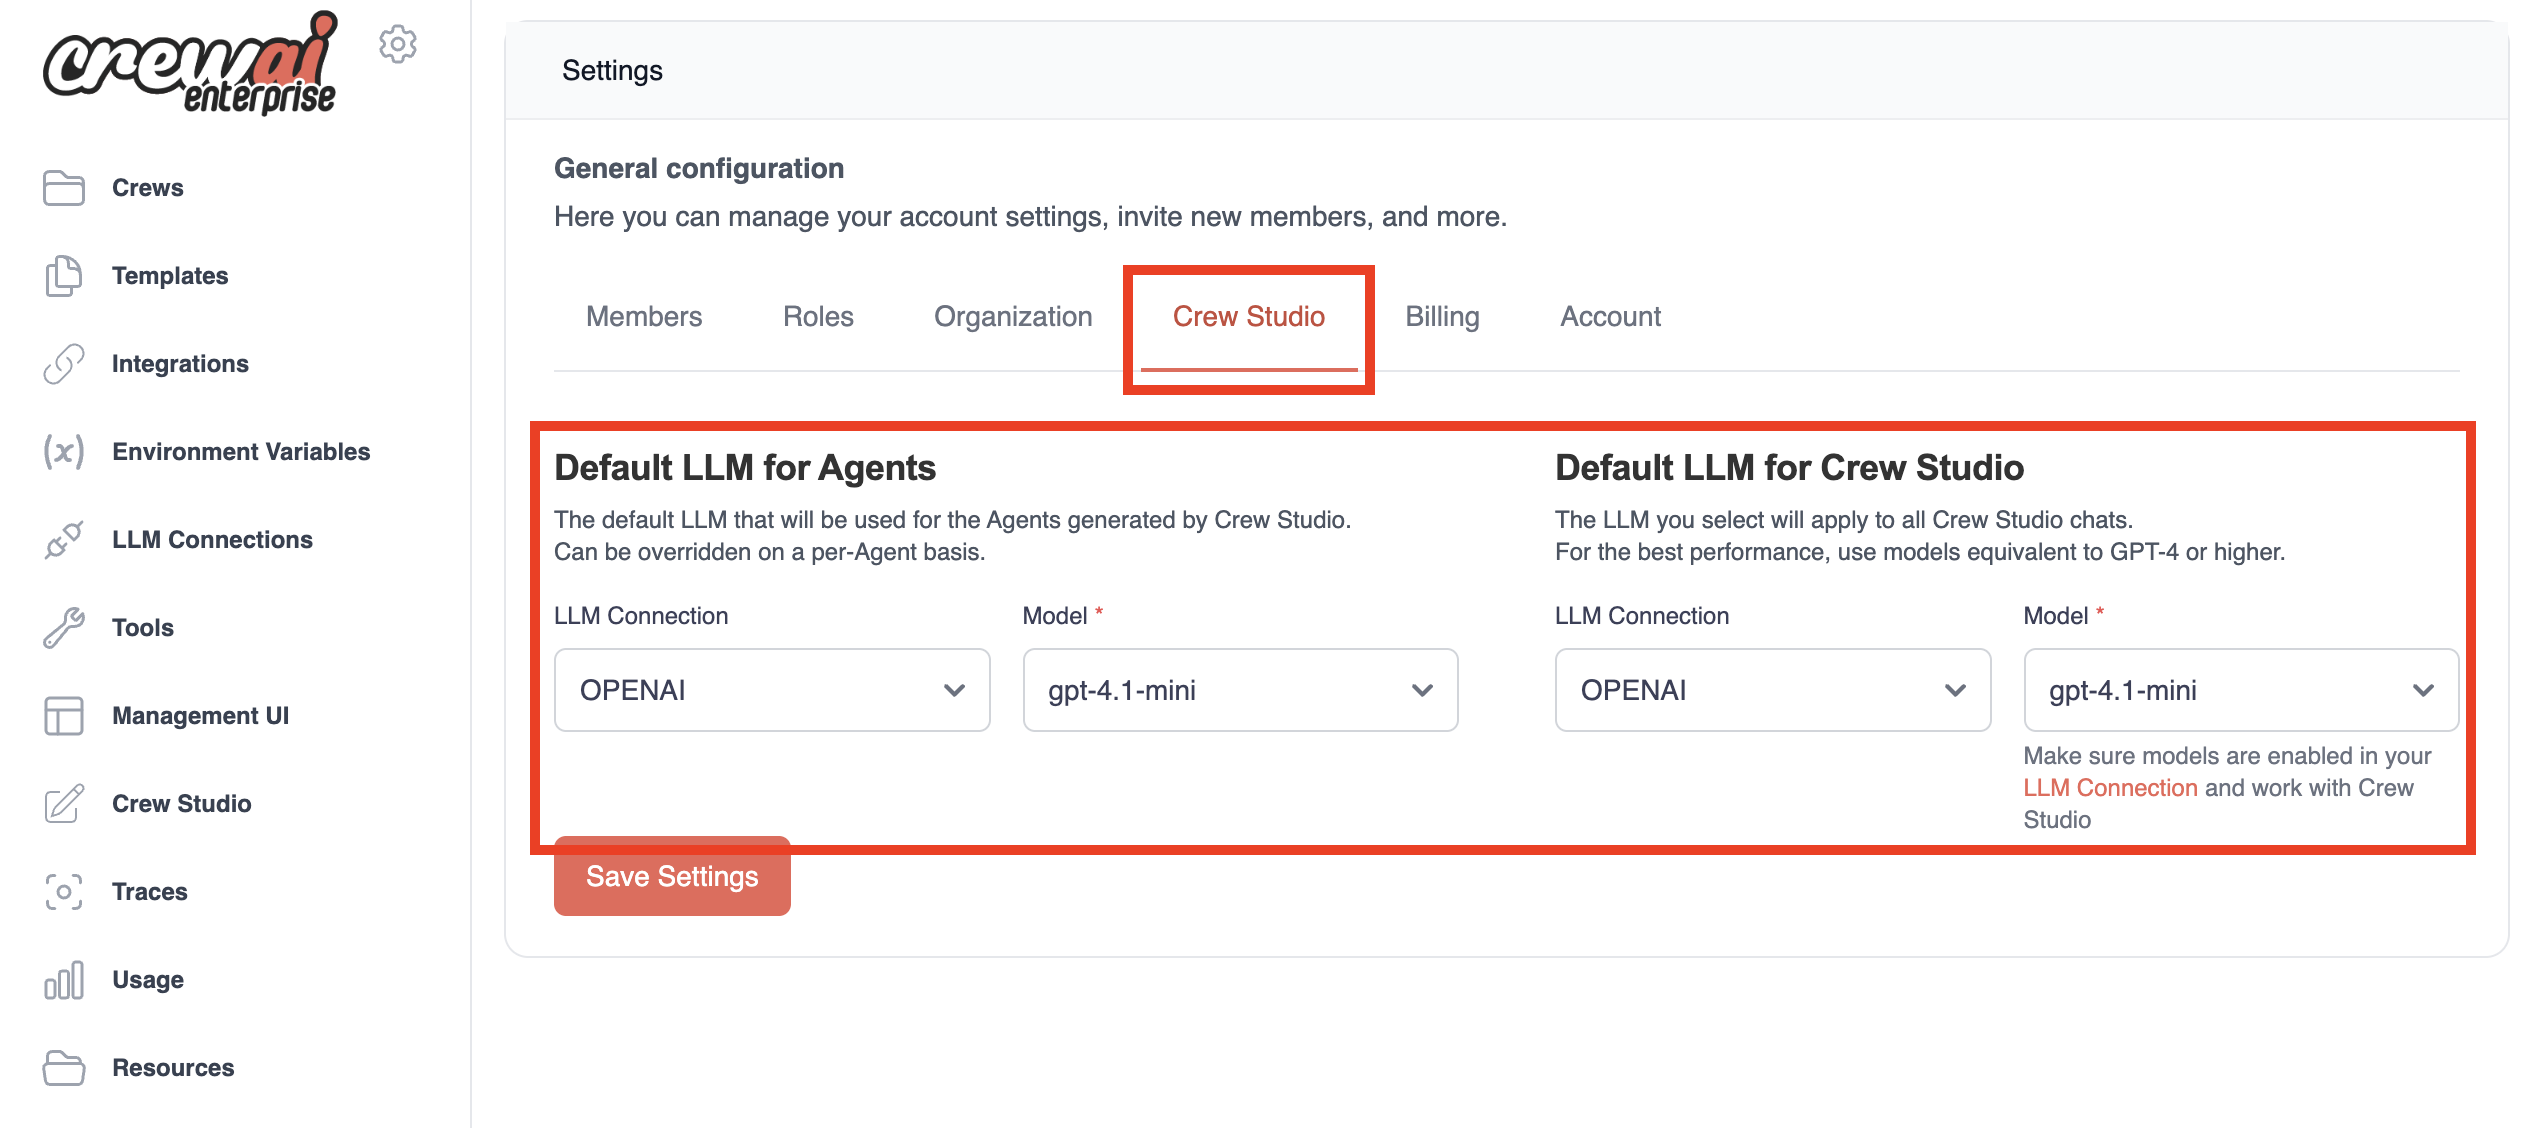
 In the main menu, go to **Settings → Defaults** and configure the LLM Defaults settings:
* Select default models for agents and other components
* Set default configurations for Crew Studio
Click `Save Settings` to apply your changes.
In the main menu, go to **Settings → Defaults** and configure the LLM Defaults settings:
* Select default models for agents and other components
* Set default configurations for Crew Studio
Click `Save Settings` to apply your changes.
 ## Using Crew Studio
Now that you've configured your LLM connection and default settings, you're ready to start using Crew Studio!
Navigate to the **Studio** section in your CrewAI AMP dashboard.
Start a conversation with the Crew Assistant by describing the problem you want to solve:
```md theme={null}
I need a crew that can research the latest AI developments and create a summary report.
```
The Crew Assistant will ask clarifying questions to better understand your requirements.
Review the generated crew configuration, including:
* Agents and their roles
* Tasks to be performed
* Required inputs
* Tools to be used
This is your opportunity to refine the configuration before proceeding.
Once you're satisfied with the configuration, you can:
* Download the generated code for local customization
* Deploy the crew directly to the CrewAI AMP platform
* Modify the configuration and regenerate the crew
After deployment, test your crew with sample inputs to ensure it performs as expected.
For best results, provide clear, detailed descriptions of what you want your
crew to accomplish. Include specific inputs and expected outputs in your
description.
## Example Workflow
Here's a typical workflow for creating a crew with Crew Studio:
Start by describing your problem:
```md theme={null}
I need a crew that can analyze financial news and provide investment recommendations
```
Respond to clarifying questions from the Crew Assistant to refine your
requirements.
Review the generated crew plan, which might include:
* A Research Agent to gather financial news
* An Analysis Agent to interpret the data
* A Recommendations Agent to provide investment advice
Approve the plan or request changes if necessary.
Download the code for customization or deploy directly to the platform.
Test your crew with sample inputs and refine as needed.
Contact our support team for assistance with Crew Studio or any other CrewAI
AMP features.
## Using Crew Studio
Now that you've configured your LLM connection and default settings, you're ready to start using Crew Studio!
Navigate to the **Studio** section in your CrewAI AMP dashboard.
Start a conversation with the Crew Assistant by describing the problem you want to solve:
```md theme={null}
I need a crew that can research the latest AI developments and create a summary report.
```
The Crew Assistant will ask clarifying questions to better understand your requirements.
Review the generated crew configuration, including:
* Agents and their roles
* Tasks to be performed
* Required inputs
* Tools to be used
This is your opportunity to refine the configuration before proceeding.
Once you're satisfied with the configuration, you can:
* Download the generated code for local customization
* Deploy the crew directly to the CrewAI AMP platform
* Modify the configuration and regenerate the crew
After deployment, test your crew with sample inputs to ensure it performs as expected.
For best results, provide clear, detailed descriptions of what you want your
crew to accomplish. Include specific inputs and expected outputs in your
description.
## Example Workflow
Here's a typical workflow for creating a crew with Crew Studio:
Start by describing your problem:
```md theme={null}
I need a crew that can analyze financial news and provide investment recommendations
```
Respond to clarifying questions from the Crew Assistant to refine your
requirements.
Review the generated crew plan, which might include:
* A Research Agent to gather financial news
* An Analysis Agent to interpret the data
* A Recommendations Agent to provide investment advice
Approve the plan or request changes if necessary.
Download the code for customization or deploy directly to the platform.
Test your crew with sample inputs and refine as needed.
Contact our support team for assistance with Crew Studio or any other CrewAI
AMP features.