> ## Documentation Index
> Fetch the complete documentation index at: https://docs.crewai.com/llms.txt
> Use this file to discover all available pages before exploring further.
# Kickoff Crew
> Kickoff a Crew on CrewAI AMP
## Overview
Once you've deployed your crew to the CrewAI AMP platform, you can kickoff executions through the web interface or the API. This guide covers both approaches.
## Method 1: Using the Web Interface
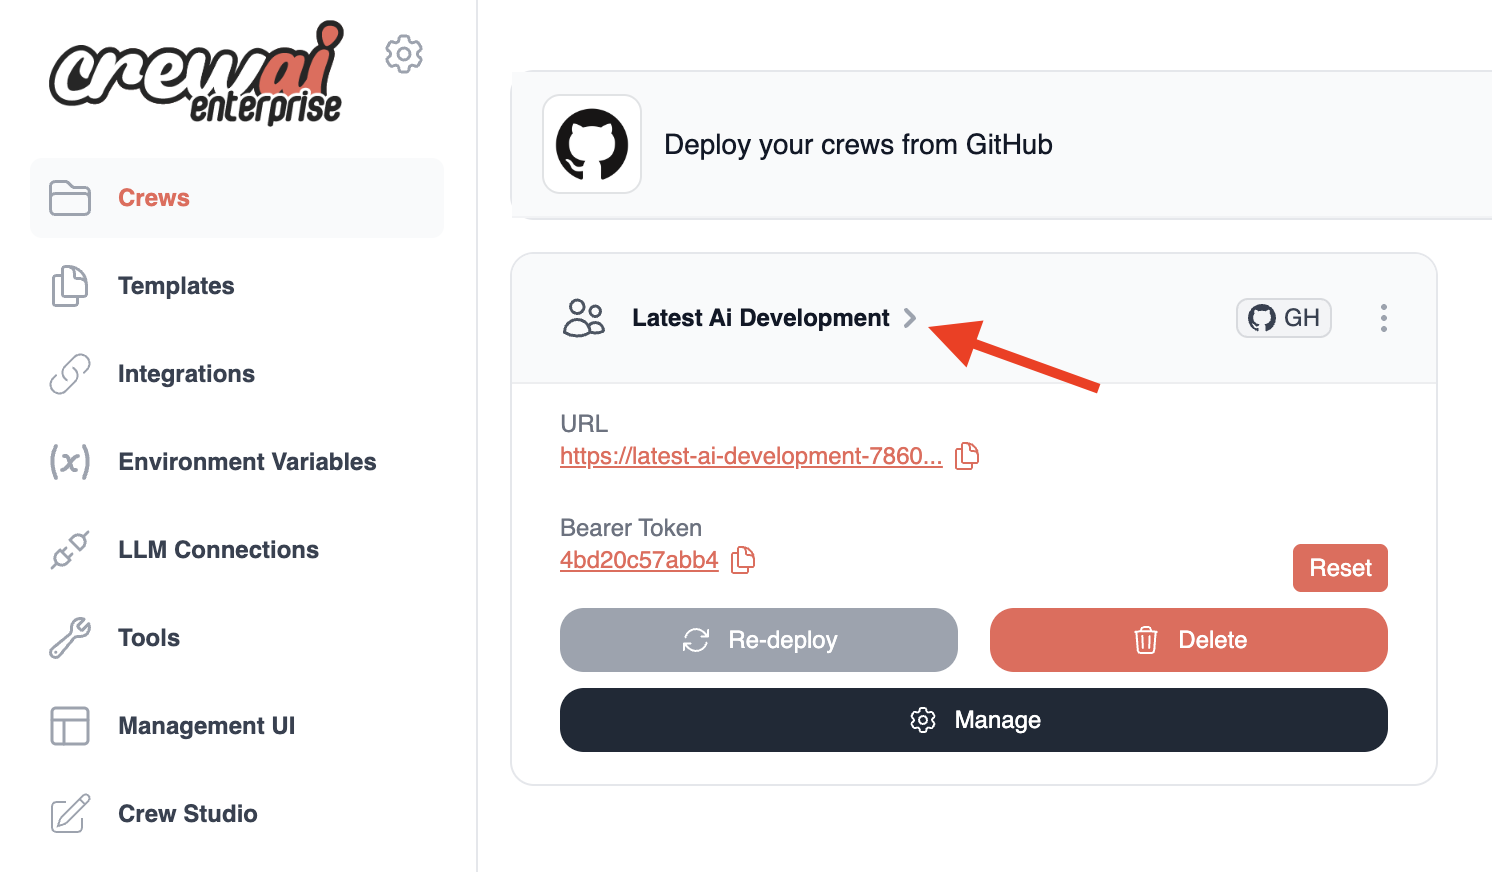
### Step 1: Navigate to Your Deployed Crew
1. Log in to [CrewAI AMP](https://app.crewai.com)
2. Click on the crew name from your projects list
3. You'll be taken to the crew's detail page
 ### Step 2: Initiate Execution
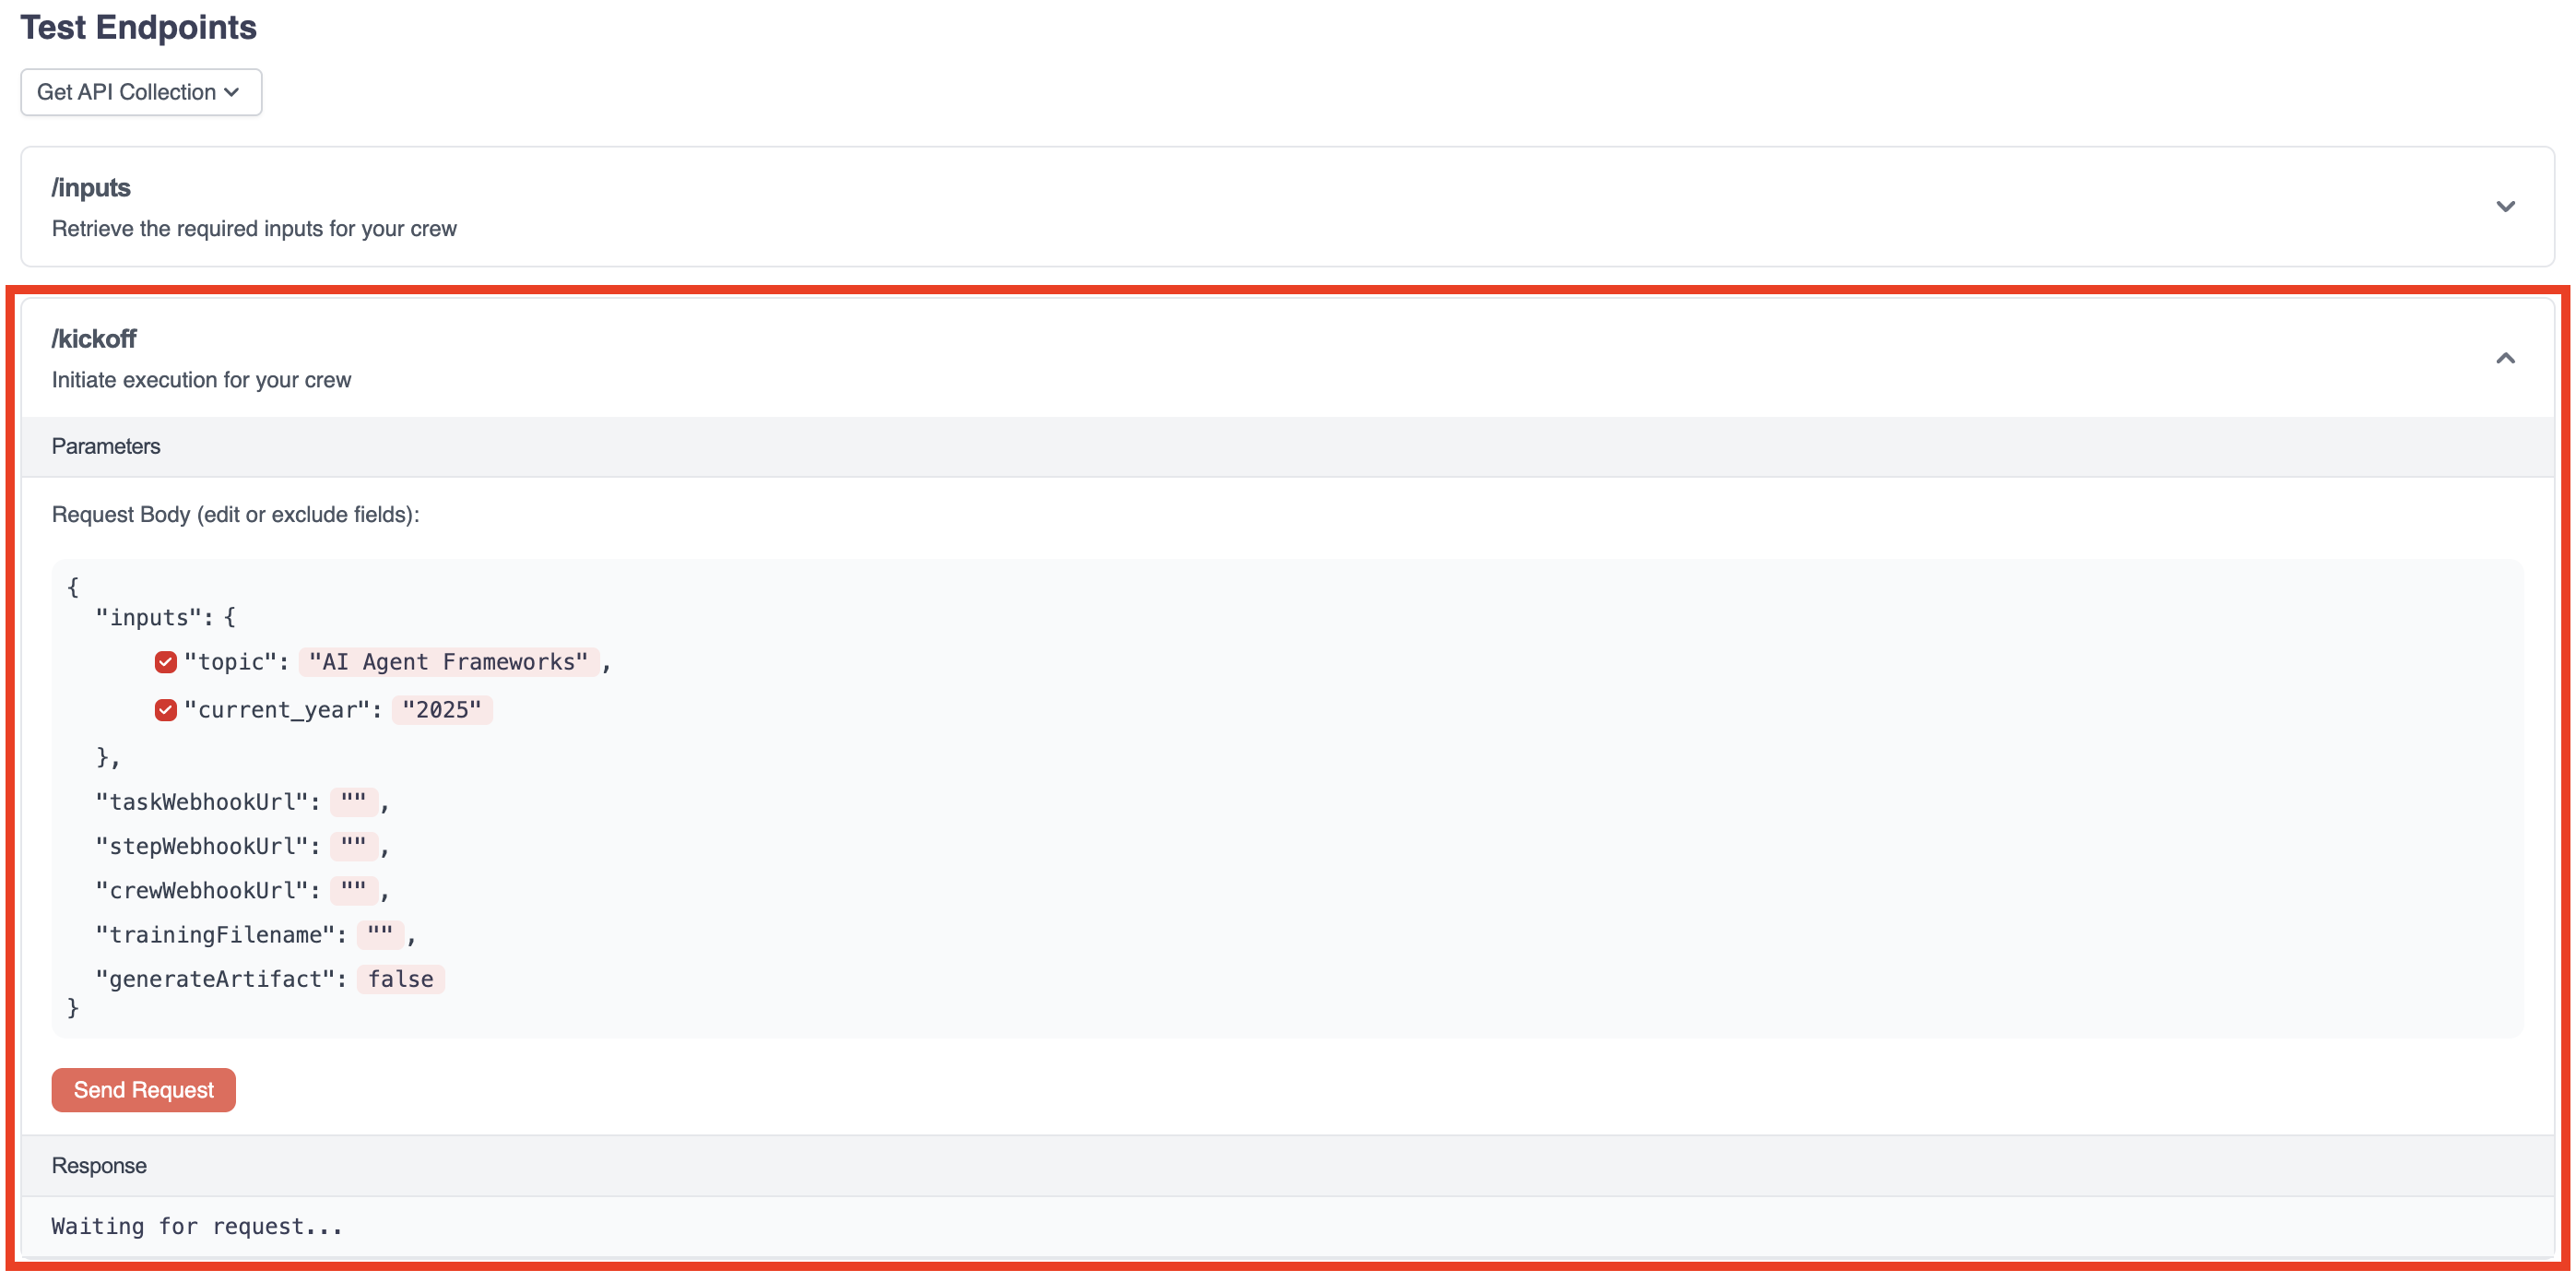
From your crew's detail page, you have two options to kickoff an execution:
#### Option A: Quick Kickoff
1. Click the `Kickoff` link in the Test Endpoints section
2. Enter the required input parameters for your crew in the JSON editor
3. Click the `Send Request` button
### Step 2: Initiate Execution
From your crew's detail page, you have two options to kickoff an execution:
#### Option A: Quick Kickoff
1. Click the `Kickoff` link in the Test Endpoints section
2. Enter the required input parameters for your crew in the JSON editor
3. Click the `Send Request` button
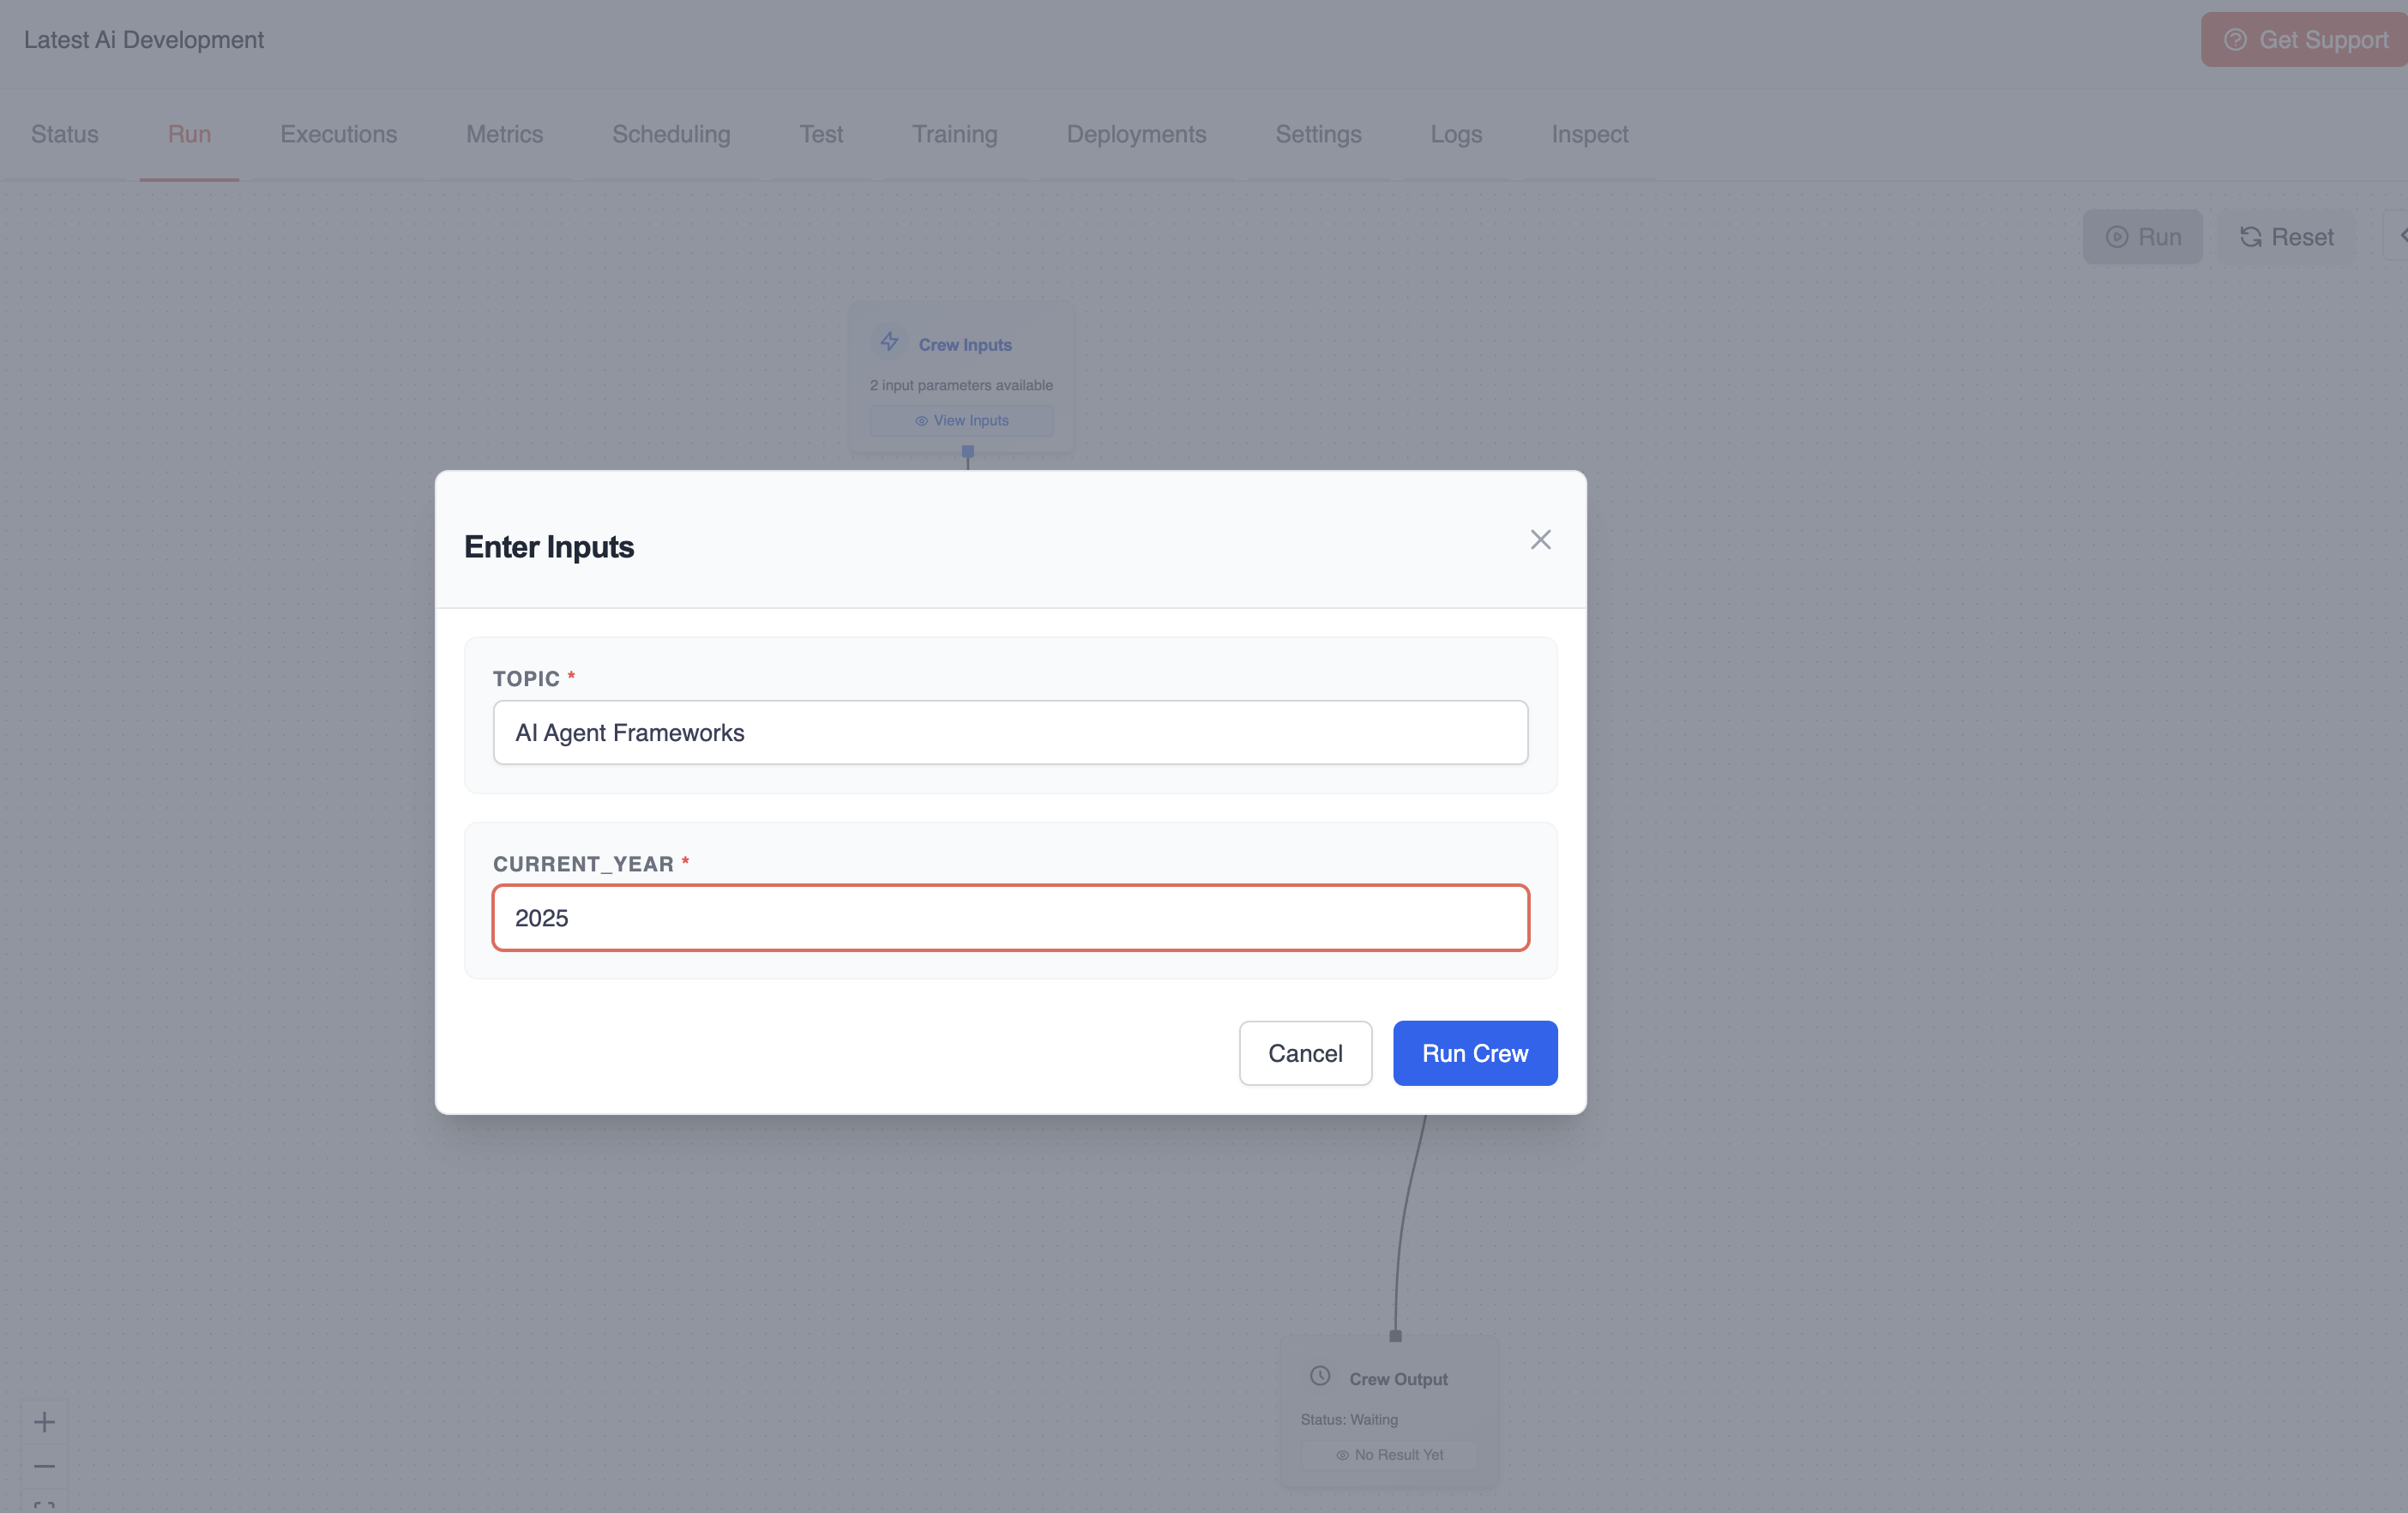
 #### Option B: Using the Visual Interface
1. Click the `Run` tab in the crew detail page
2. Enter the required inputs in the form fields
3. Click the `Run Crew` button
#### Option B: Using the Visual Interface
1. Click the `Run` tab in the crew detail page
2. Enter the required inputs in the form fields
3. Click the `Run Crew` button
 ### Step 3: Monitor Execution Progress
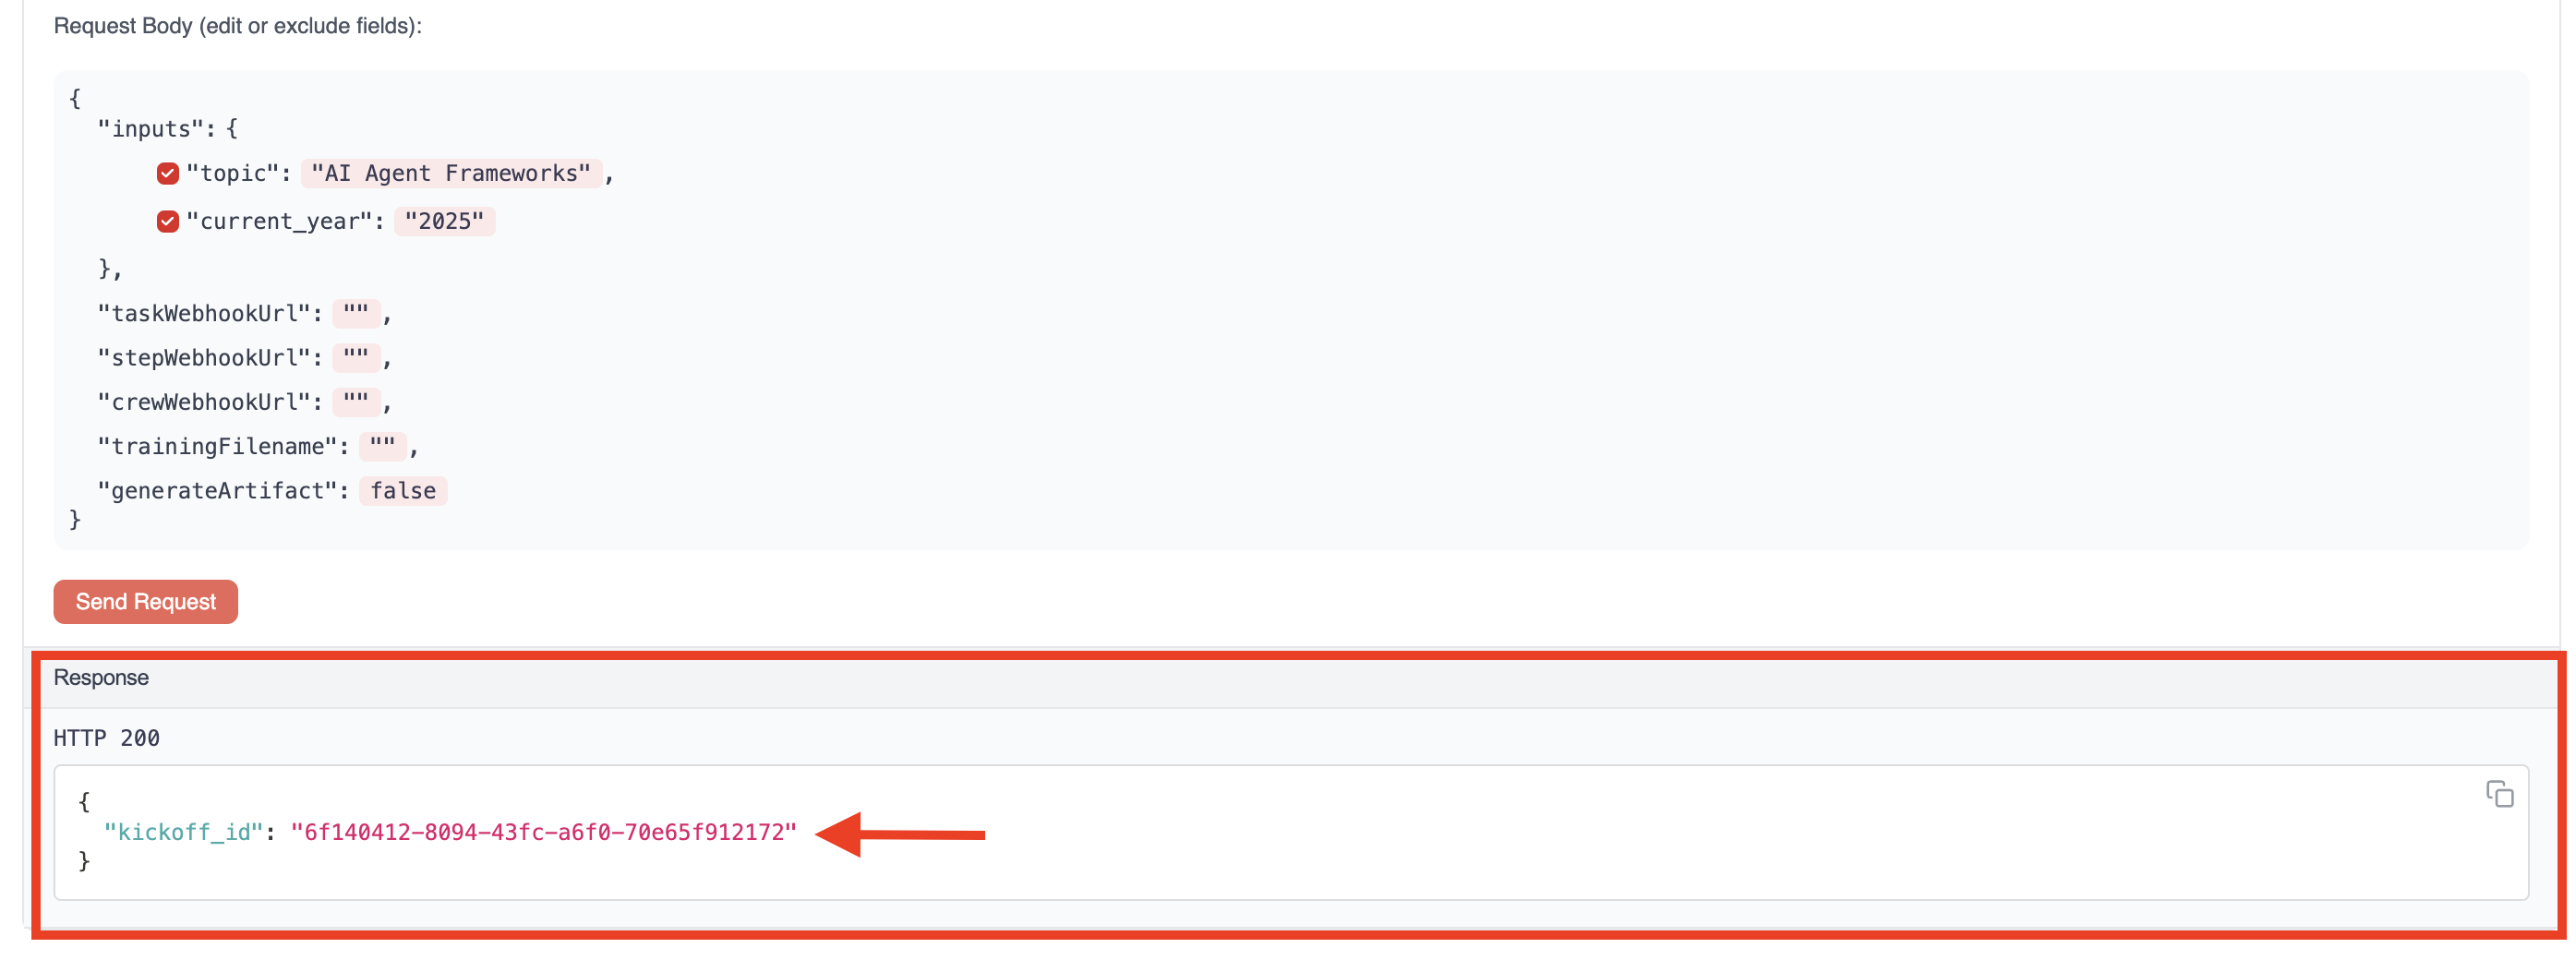
After initiating the execution:
1. You'll receive a response containing a `kickoff_id` - **copy this ID**
2. This ID is essential for tracking your execution
### Step 3: Monitor Execution Progress
After initiating the execution:
1. You'll receive a response containing a `kickoff_id` - **copy this ID**
2. This ID is essential for tracking your execution
 ### Step 4: Check Execution Status
To monitor the progress of your execution:
1. Click the "Status" endpoint in the Test Endpoints section
2. Paste the `kickoff_id` into the designated field
3. Click the "Get Status" button
### Step 4: Check Execution Status
To monitor the progress of your execution:
1. Click the "Status" endpoint in the Test Endpoints section
2. Paste the `kickoff_id` into the designated field
3. Click the "Get Status" button
 The status response will show:
* Current execution state (`running`, `completed`, etc.)
* Details about which tasks are in progress
* Any outputs produced so far
### Step 5: View Final Results
Once execution is complete:
1. The status will change to `completed`
2. You can view the full execution results and outputs
3. For a more detailed view, check the `Executions` tab in the crew detail page
## Method 2: Using the API
You can also kickoff crews programmatically using the CrewAI AMP REST API.
### Authentication
All API requests require a bearer token for authentication:
```bash theme={null}
curl -H "Authorization: Bearer YOUR_CREW_TOKEN" https://your-crew-url.crewai.com
```
Your bearer token is available on the Status tab of your crew's detail page.
### Checking Crew Health
Before executing operations, you can verify that your crew is running properly:
```bash theme={null}
curl -H "Authorization: Bearer YOUR_CREW_TOKEN" https://your-crew-url.crewai.com
```
A successful response will return a message indicating the crew is operational:
```
Healthy%
```
### Step 1: Retrieve Required Inputs
First, determine what inputs your crew requires:
```bash theme={null}
curl -X GET \
-H "Authorization: Bearer YOUR_CREW_TOKEN" \
https://your-crew-url.crewai.com/inputs
```
The response will be a JSON object containing an array of required input parameters, for example:
```json theme={null}
{ "inputs": ["topic", "current_year"] }
```
This example shows that this particular crew requires two inputs: `topic` and `current_year`.
### Step 2: Kickoff Execution
Initiate execution by providing the required inputs:
```bash theme={null}
curl -X POST \
-H "Content-Type: application/json" \
-H "Authorization: Bearer YOUR_CREW_TOKEN" \
-d '{"inputs": {"topic": "AI Agent Frameworks", "current_year": "2025"}}' \
https://your-crew-url.crewai.com/kickoff
```
The response will include a `kickoff_id` that you'll need for tracking:
```json theme={null}
{ "kickoff_id": "abcd1234-5678-90ef-ghij-klmnopqrstuv" }
```
### Step 3: Check Execution Status
Monitor the execution progress using the kickoff\_id:
```bash theme={null}
curl -X GET \
-H "Authorization: Bearer YOUR_CREW_TOKEN" \
https://your-crew-url.crewai.com/status/abcd1234-5678-90ef-ghij-klmnopqrstuv
```
## Handling Executions
### Long-Running Executions
For executions that may take a long time:
1. Consider implementing a polling mechanism to check status periodically
2. Use webhooks (if available) for notification when execution completes
3. Implement error handling for potential timeouts
### Execution Context
The execution context includes:
* Inputs provided at kickoff
* Environment variables configured during deployment
* Any state maintained between tasks
### Debugging Failed Executions
If an execution fails:
1. Check the "Executions" tab for detailed logs
2. Review the "Traces" tab for step-by-step execution details
3. Look for LLM responses and tool usage in the trace details
Contact our support team for assistance with execution issues or questions
about the Enterprise platform.
The status response will show:
* Current execution state (`running`, `completed`, etc.)
* Details about which tasks are in progress
* Any outputs produced so far
### Step 5: View Final Results
Once execution is complete:
1. The status will change to `completed`
2. You can view the full execution results and outputs
3. For a more detailed view, check the `Executions` tab in the crew detail page
## Method 2: Using the API
You can also kickoff crews programmatically using the CrewAI AMP REST API.
### Authentication
All API requests require a bearer token for authentication:
```bash theme={null}
curl -H "Authorization: Bearer YOUR_CREW_TOKEN" https://your-crew-url.crewai.com
```
Your bearer token is available on the Status tab of your crew's detail page.
### Checking Crew Health
Before executing operations, you can verify that your crew is running properly:
```bash theme={null}
curl -H "Authorization: Bearer YOUR_CREW_TOKEN" https://your-crew-url.crewai.com
```
A successful response will return a message indicating the crew is operational:
```
Healthy%
```
### Step 1: Retrieve Required Inputs
First, determine what inputs your crew requires:
```bash theme={null}
curl -X GET \
-H "Authorization: Bearer YOUR_CREW_TOKEN" \
https://your-crew-url.crewai.com/inputs
```
The response will be a JSON object containing an array of required input parameters, for example:
```json theme={null}
{ "inputs": ["topic", "current_year"] }
```
This example shows that this particular crew requires two inputs: `topic` and `current_year`.
### Step 2: Kickoff Execution
Initiate execution by providing the required inputs:
```bash theme={null}
curl -X POST \
-H "Content-Type: application/json" \
-H "Authorization: Bearer YOUR_CREW_TOKEN" \
-d '{"inputs": {"topic": "AI Agent Frameworks", "current_year": "2025"}}' \
https://your-crew-url.crewai.com/kickoff
```
The response will include a `kickoff_id` that you'll need for tracking:
```json theme={null}
{ "kickoff_id": "abcd1234-5678-90ef-ghij-klmnopqrstuv" }
```
### Step 3: Check Execution Status
Monitor the execution progress using the kickoff\_id:
```bash theme={null}
curl -X GET \
-H "Authorization: Bearer YOUR_CREW_TOKEN" \
https://your-crew-url.crewai.com/status/abcd1234-5678-90ef-ghij-klmnopqrstuv
```
## Handling Executions
### Long-Running Executions
For executions that may take a long time:
1. Consider implementing a polling mechanism to check status periodically
2. Use webhooks (if available) for notification when execution completes
3. Implement error handling for potential timeouts
### Execution Context
The execution context includes:
* Inputs provided at kickoff
* Environment variables configured during deployment
* Any state maintained between tasks
### Debugging Failed Executions
If an execution fails:
1. Check the "Executions" tab for detailed logs
2. Review the "Traces" tab for step-by-step execution details
3. Look for LLM responses and tool usage in the trace details
Contact our support team for assistance with execution issues or questions
about the Enterprise platform.