> ## Documentation Index
> Fetch the complete documentation index at: https://docs.crewai.com/llms.txt
> Use this file to discover all available pages before exploring further.
# 팀 관리
> CrewAI AMP 조직에서 팀원을 초대하고 관리하는 방법을 알아보세요
CrewAI AMP 계정의 관리자라면 새로운 팀원을 조직에 쉽게 초대할 수 있습니다. 이 안내서는 단계별로 프로세스를 안내합니다.
## 팀 멤버 초대하기
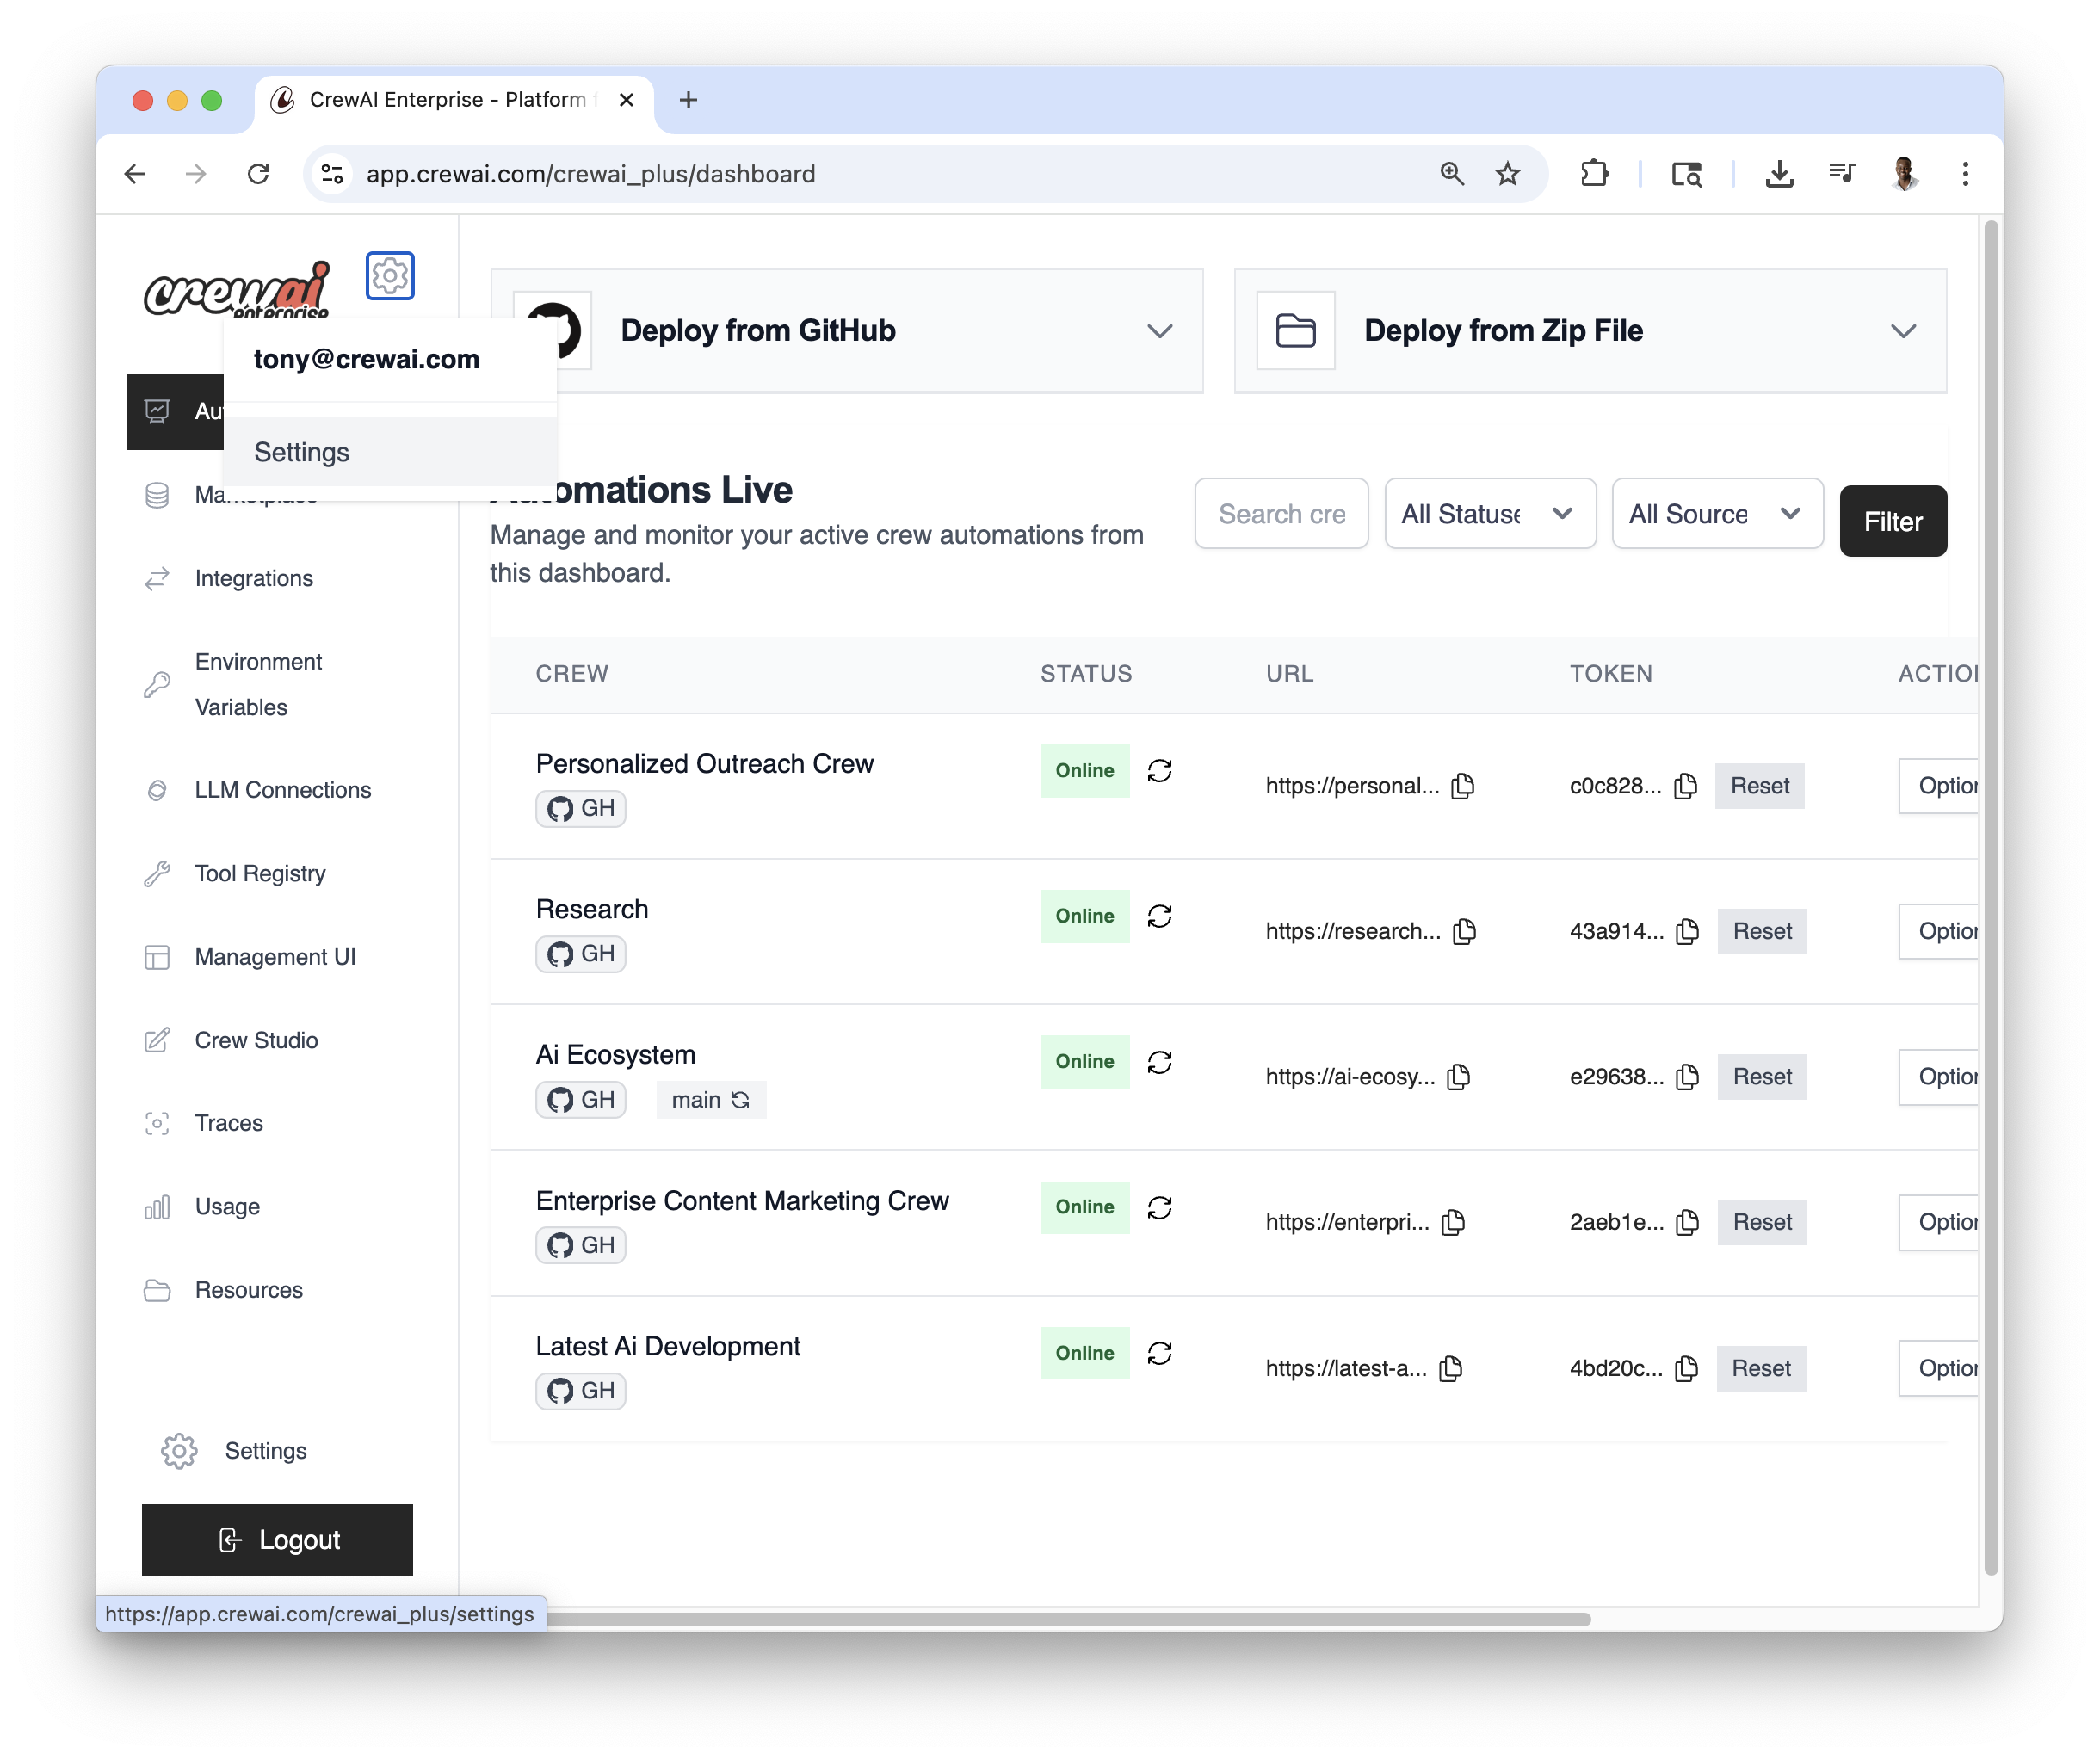
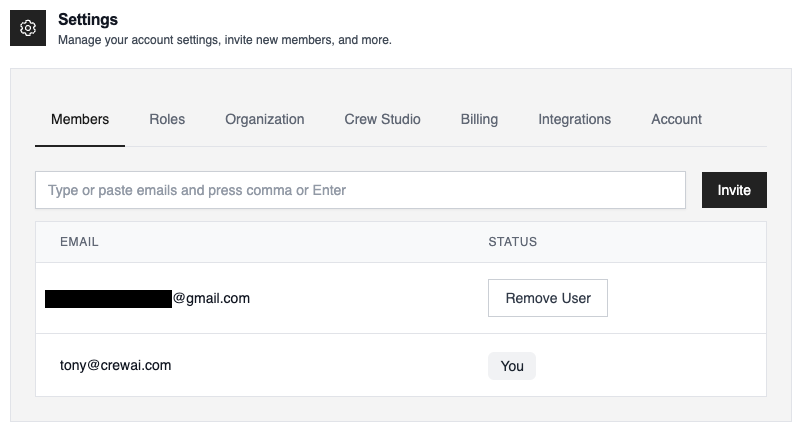
* CrewAI AMP 계정에 로그인합니다 - 대시보드 오른쪽 상단에 있는 기어
아이콘(⚙️)을 찾습니다 - 기어 아이콘을 클릭하여 **설정** 페이지에 접속합니다:
 * 설정 페이지에서 `Members` 탭이 보입니다 - `Members` 탭을 클릭하여 **멤버**
페이지에 접속합니다:
* 설정 페이지에서 `Members` 탭이 보입니다 - `Members` 탭을 클릭하여 **멤버**
페이지에 접속합니다:
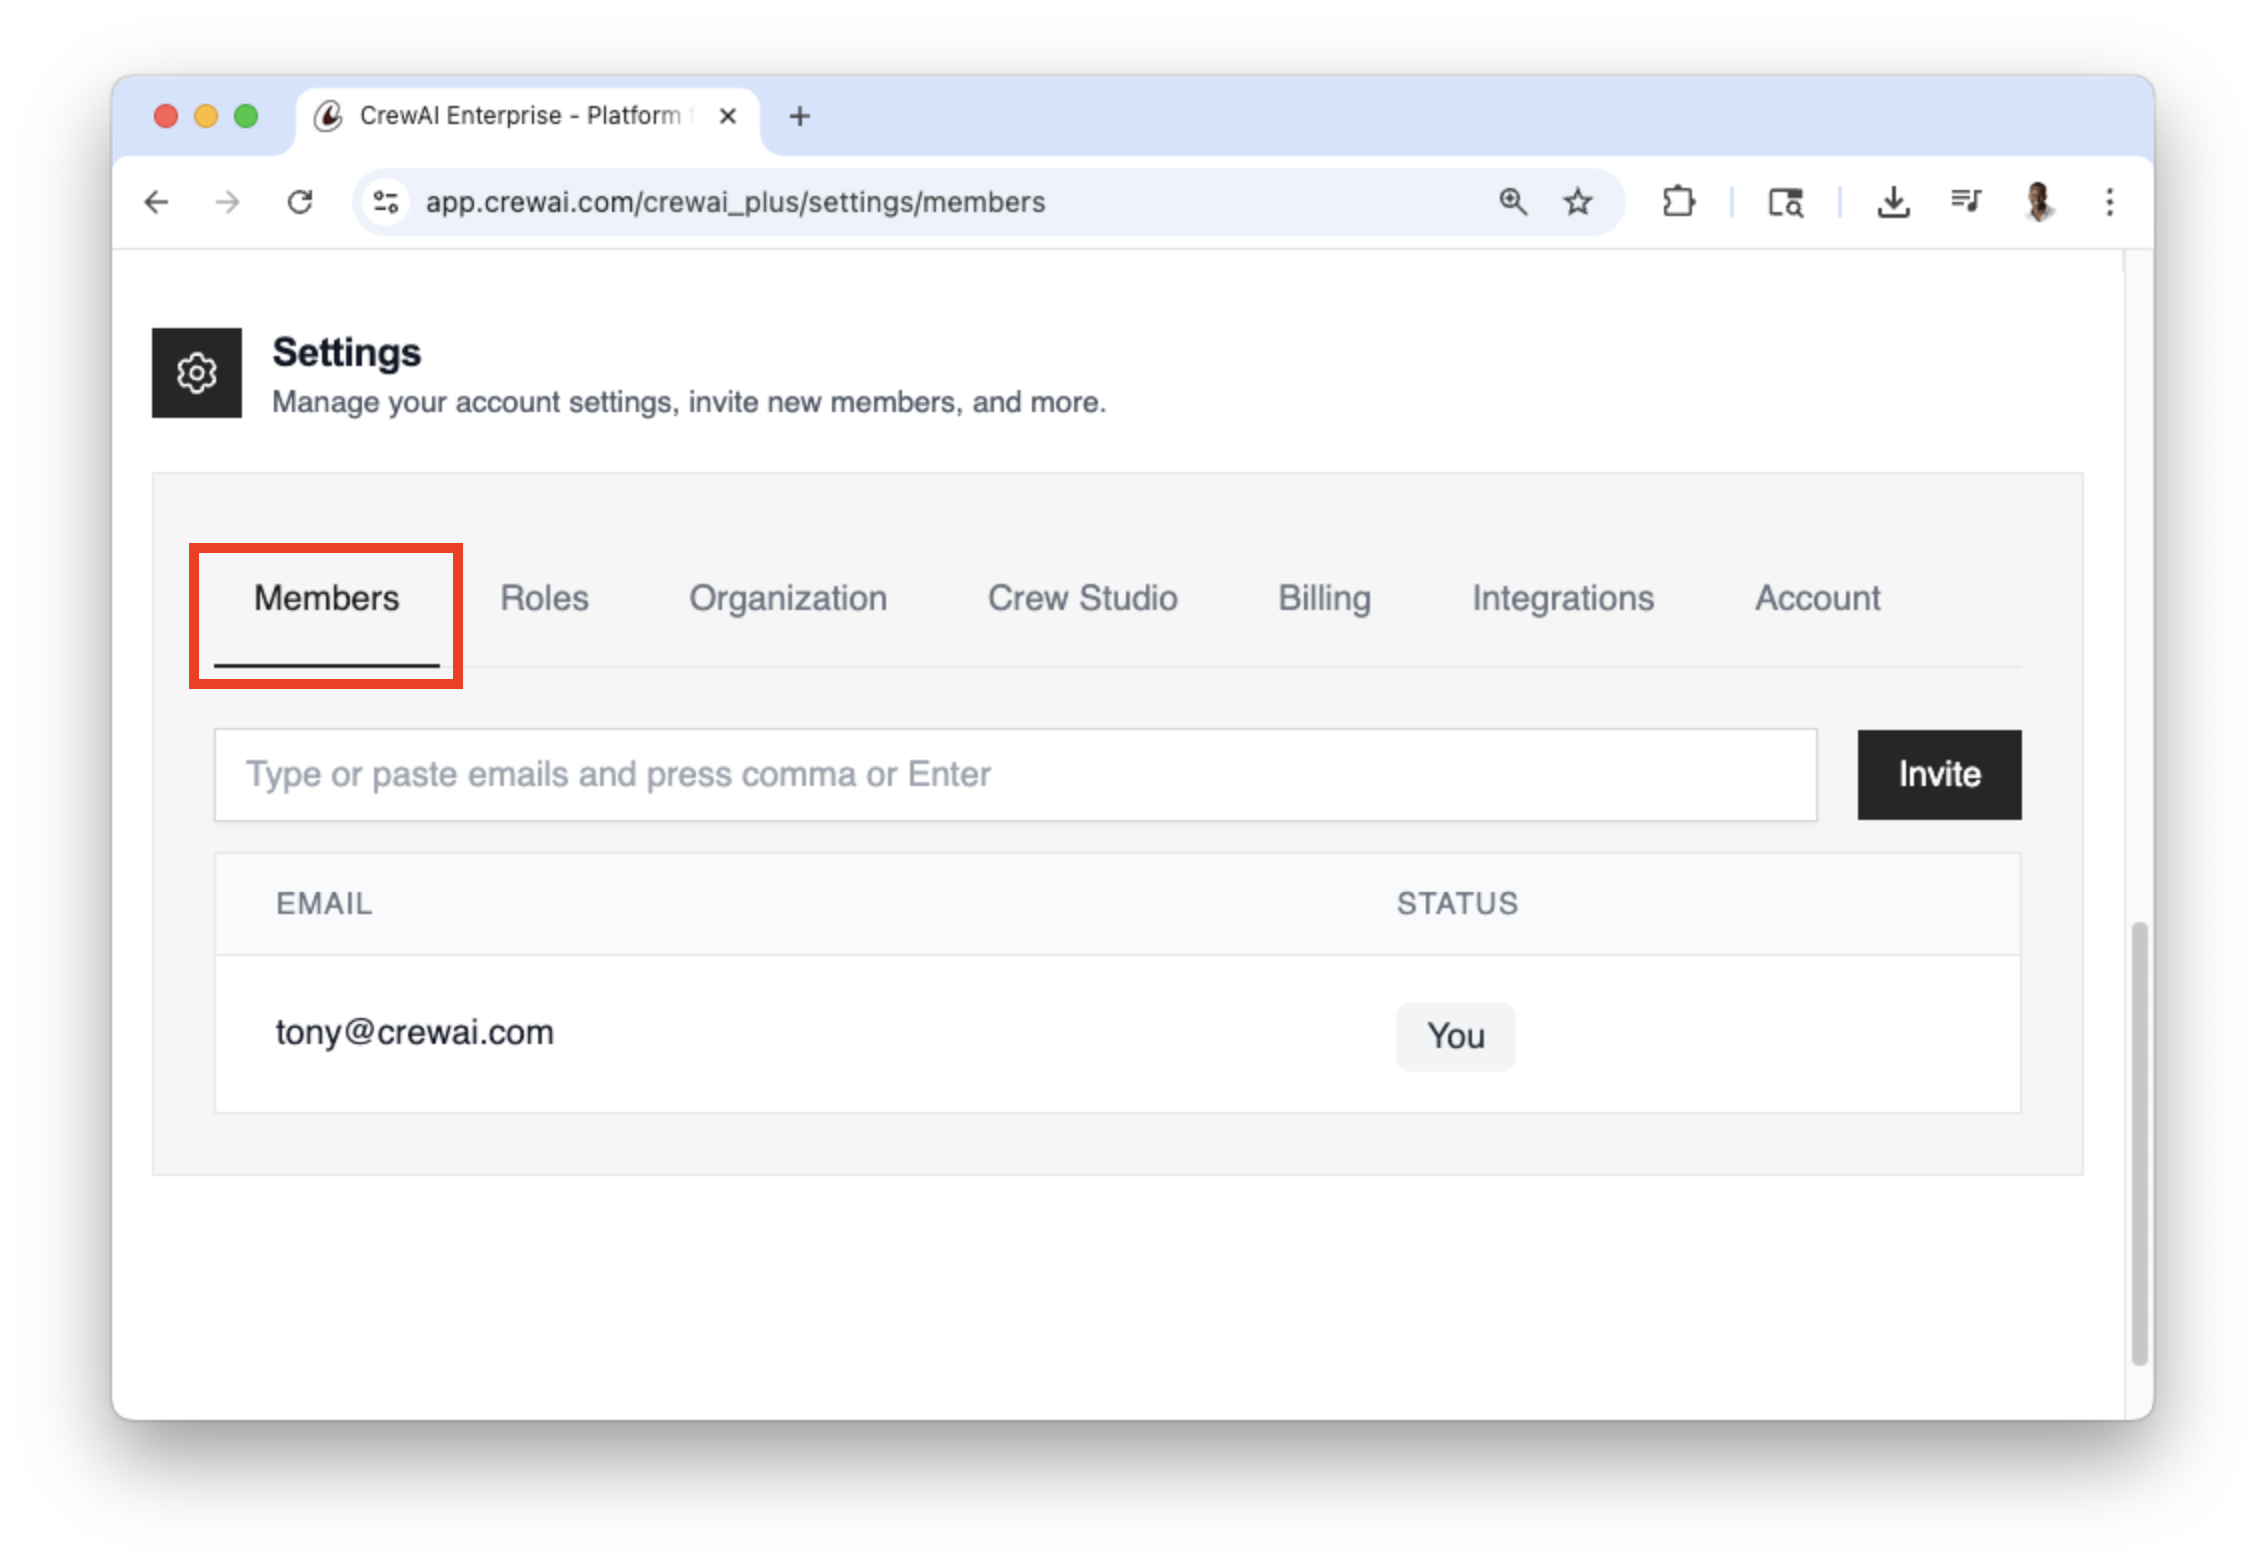 * 멤버 섹션에서 현재 멤버 목록(본인 포함)을 확인할 수 있습니다 - `Email`
입력 필드를 찾습니다 - 초대하고자 하는 사람의 이메일 주소를 입력합니다 -
`Invite` 버튼을 클릭하여 초대장을 보냅니다
* 이 과정을 반복하여 여러 팀 멤버를 초대할 수 있습니다 - 초대한 각 멤버는
조직에 가입할 수 있는 이메일 초대장을 받게 됩니다
## 역할 추가하기
플랫폼의 다양한 부분에 대한 접근 권한을 제어하기 위해 팀원들에게 역할을 추가할 수 있습니다.
* CrewAI AMP 계정에 로그인하세요 - 대시보드 오른쪽 상단에서 기어
아이콘(⚙️)을 찾으세요 - 기어 아이콘을 클릭하여 **설정** 페이지에 접근하세요:
* 설정 페이지에서 `Roles` 탭을 확인할 수 있습니다 - `Roles` 탭을 클릭하여
**Roles** 페이지로 이동하세요.
* 멤버 섹션에서 현재 멤버 목록(본인 포함)을 확인할 수 있습니다 - `Email`
입력 필드를 찾습니다 - 초대하고자 하는 사람의 이메일 주소를 입력합니다 -
`Invite` 버튼을 클릭하여 초대장을 보냅니다
* 이 과정을 반복하여 여러 팀 멤버를 초대할 수 있습니다 - 초대한 각 멤버는
조직에 가입할 수 있는 이메일 초대장을 받게 됩니다
## 역할 추가하기
플랫폼의 다양한 부분에 대한 접근 권한을 제어하기 위해 팀원들에게 역할을 추가할 수 있습니다.
* CrewAI AMP 계정에 로그인하세요 - 대시보드 오른쪽 상단에서 기어
아이콘(⚙️)을 찾으세요 - 기어 아이콘을 클릭하여 **설정** 페이지에 접근하세요:
* 설정 페이지에서 `Roles` 탭을 확인할 수 있습니다 - `Roles` 탭을 클릭하여
**Roles** 페이지로 이동하세요.
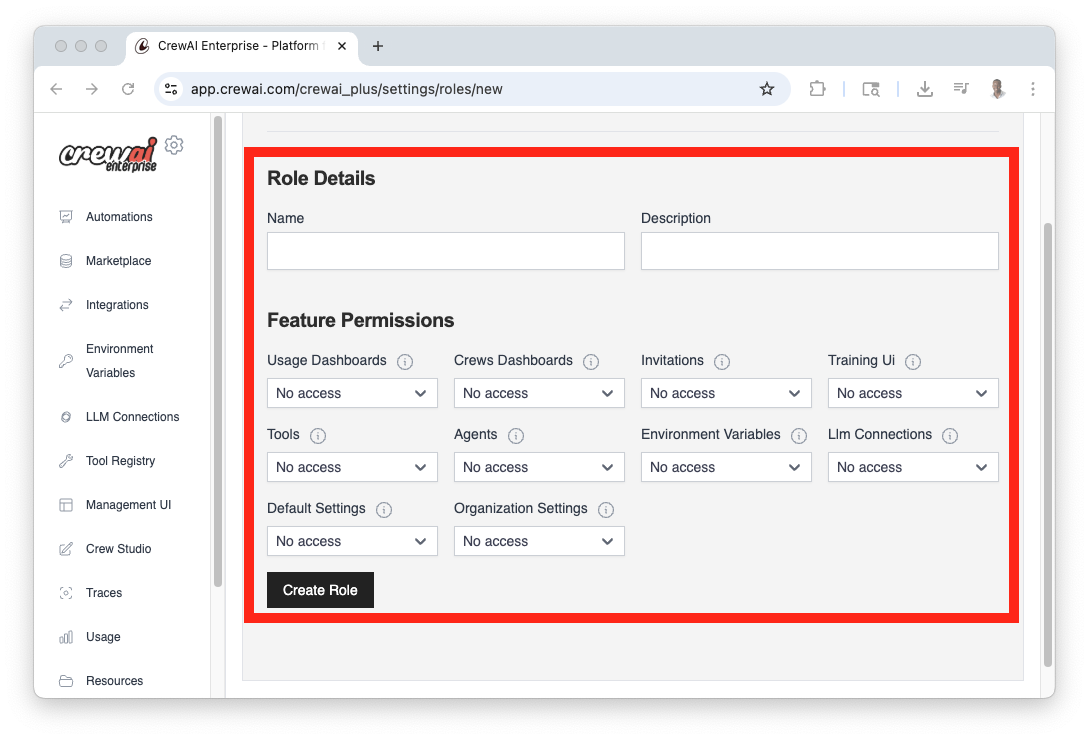
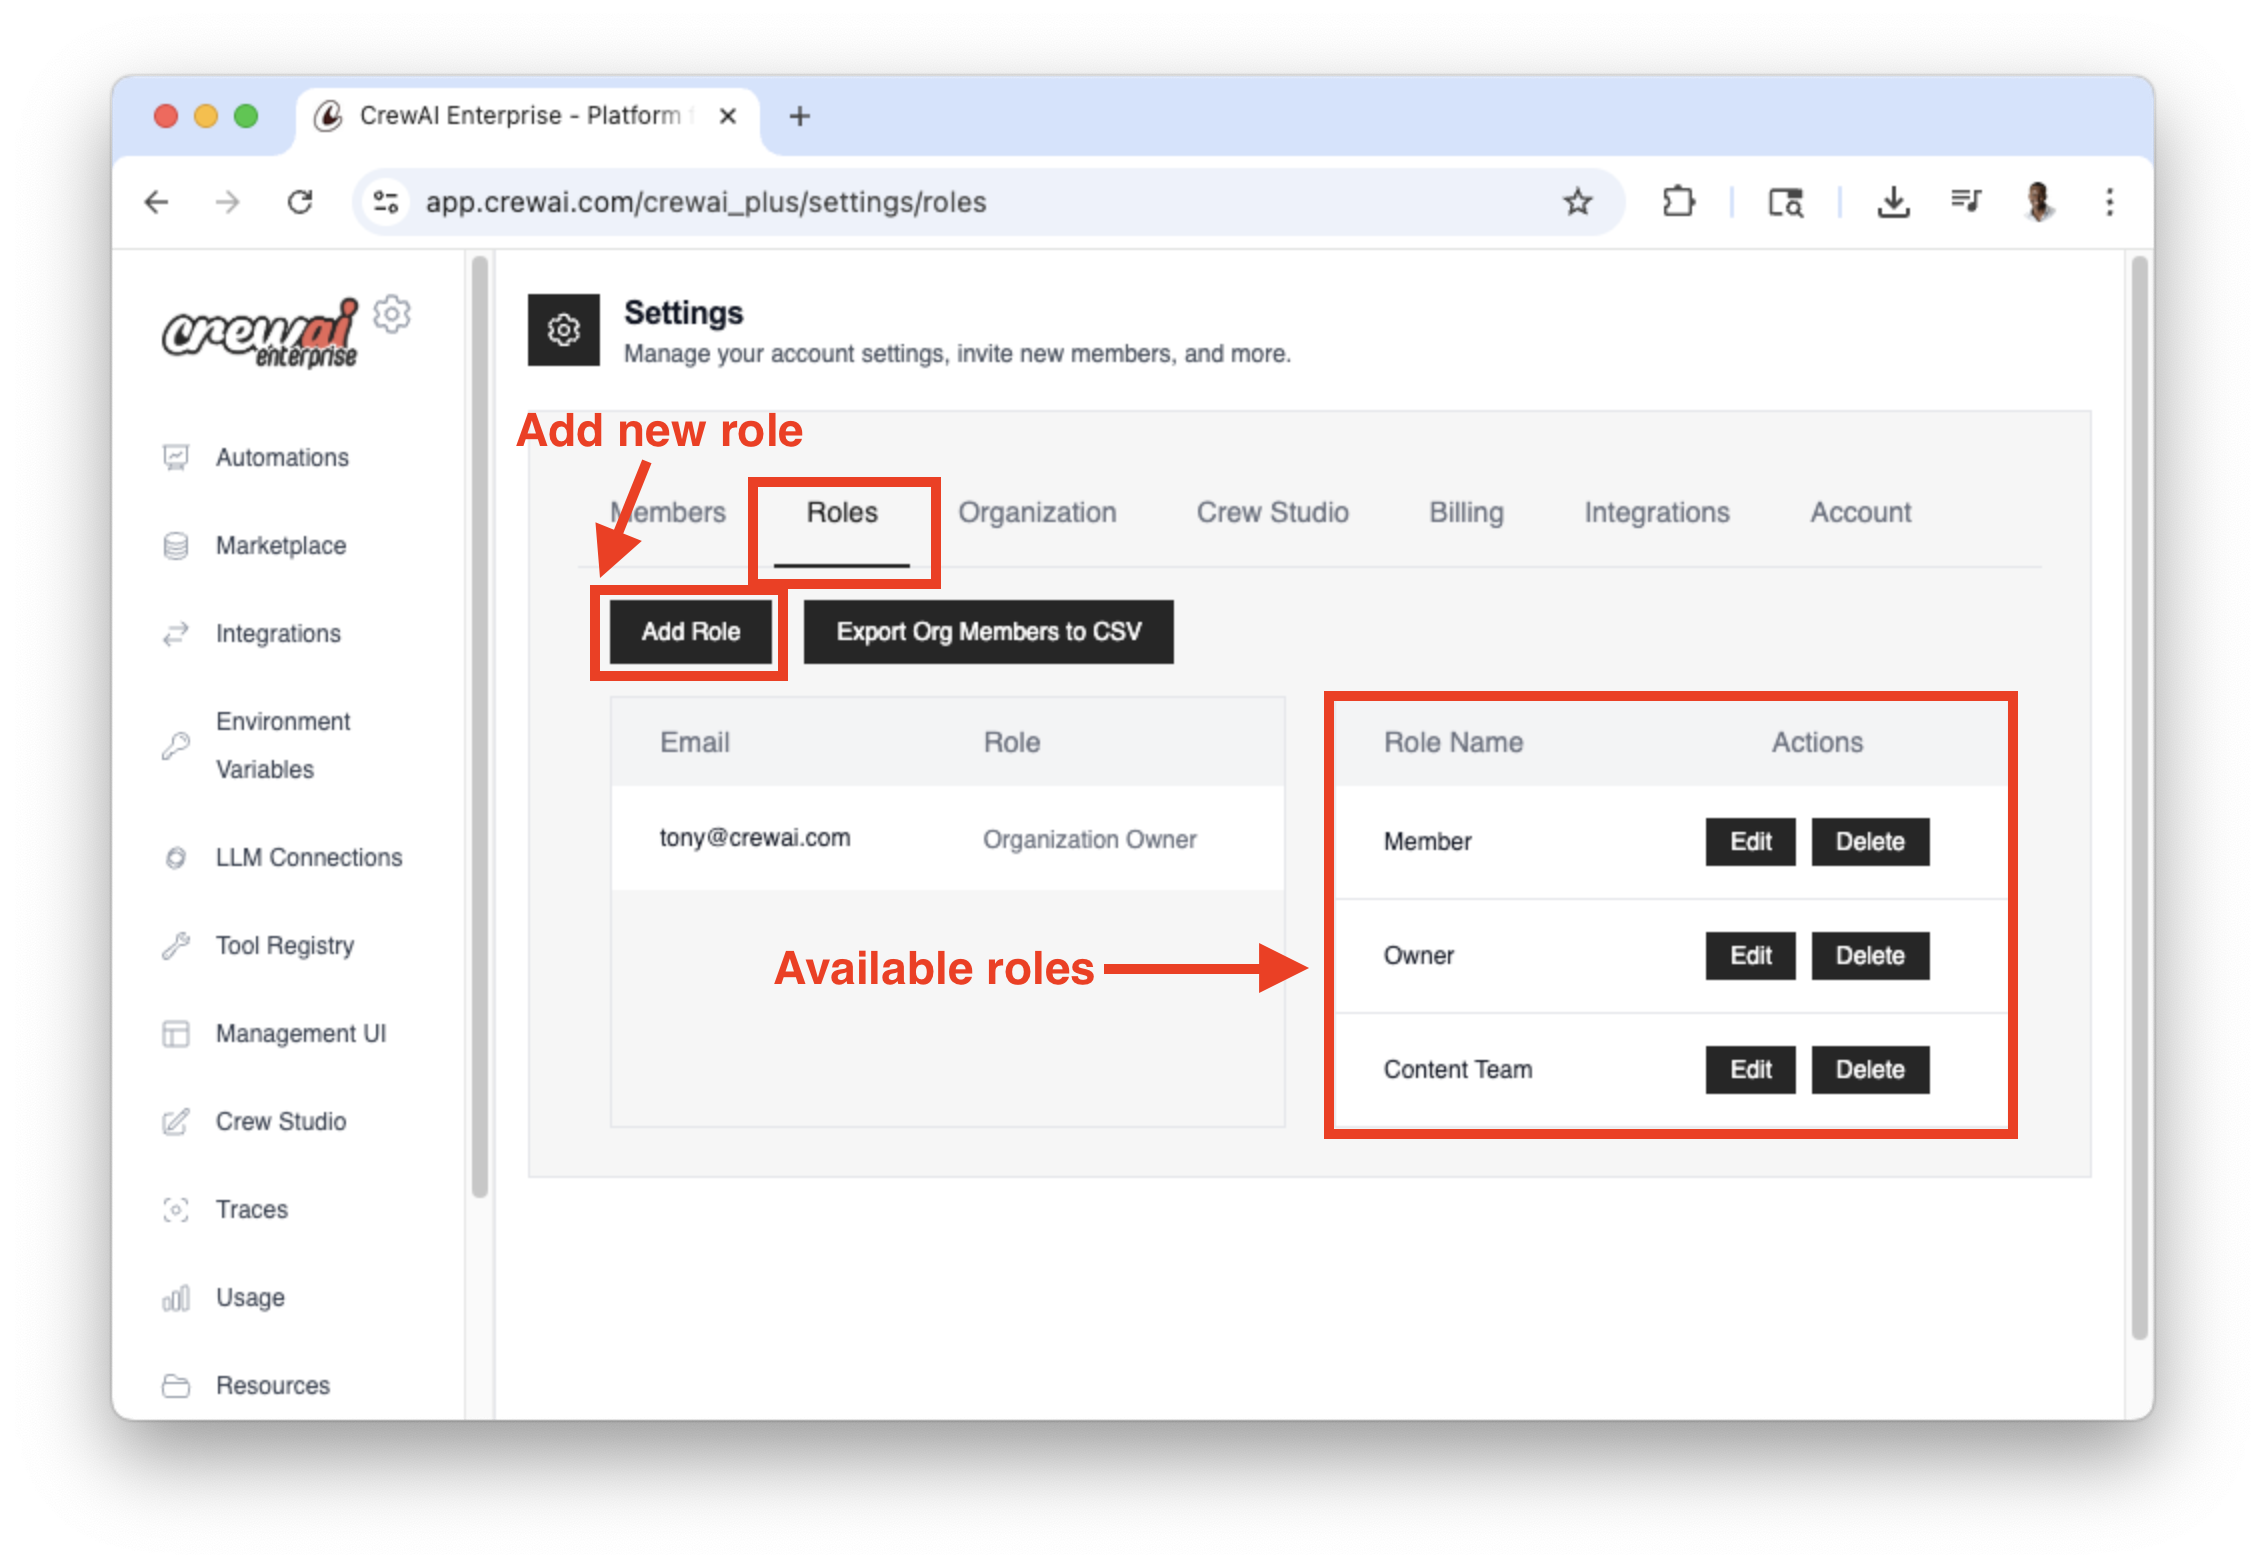 * 새로운 역할을 추가하려면 `Add Role` 버튼을 클릭하세요. - 역할의
세부 정보와 권한을 입력한 후 `Create Role` 버튼을 클릭하여 역할을
생성하세요.
* 새로운 역할을 추가하려면 `Add Role` 버튼을 클릭하세요. - 역할의
세부 정보와 권한을 입력한 후 `Create Role` 버튼을 클릭하여 역할을
생성하세요.
 * 멤버 섹션에서 현재 멤버(본인 포함) 목록을 확인할 수 있습니다
 * 멤버가 초대를 수락하면 역할을 추가할 수 있습니다. - 다시 `Roles`
탭으로 이동하세요 - 역할을 추가할 멤버로 이동한 후 `Role` 열에서 드롭다운을
클릭하세요 - 멤버에게 추가할 역할을 선택하세요 - `Update` 버튼을 클릭하여
역할을 저장하세요
* 멤버가 초대를 수락하면 역할을 추가할 수 있습니다. - 다시 `Roles`
탭으로 이동하세요 - 역할을 추가할 멤버로 이동한 후 `Role` 열에서 드롭다운을
클릭하세요 - 멤버에게 추가할 역할을 선택하세요 - `Update` 버튼을 클릭하여
역할을 저장하세요
 ## 중요 참고 사항
* **관리자 권한**: 관리자 권한이 있는 사용자만 새 멤버를 초대할 수 있습니다
* **이메일 정확성**: 팀 멤버의 정확한 이메일 주소를 확인하세요
* **초대 수락**: 초대된 멤버는 조직에 가입하기 위해 초대를 수락해야 합니다
* **이메일 알림**: 팀 멤버에게 초대 이메일(스팸 폴더 포함)을 확인하도록 안내할 수 있습니다
이 단계들을 따르면 팀을 손쉽게 확장하고 CrewAI AMP 조직 내에서 더욱 효과적으로 협업할 수 있습니다.
## 중요 참고 사항
* **관리자 권한**: 관리자 권한이 있는 사용자만 새 멤버를 초대할 수 있습니다
* **이메일 정확성**: 팀 멤버의 정확한 이메일 주소를 확인하세요
* **초대 수락**: 초대된 멤버는 조직에 가입하기 위해 초대를 수락해야 합니다
* **이메일 알림**: 팀 멤버에게 초대 이메일(스팸 폴더 포함)을 확인하도록 안내할 수 있습니다
이 단계들을 따르면 팀을 손쉽게 확장하고 CrewAI AMP 조직 내에서 더욱 효과적으로 협업할 수 있습니다.