
Taking Control of AI Workflows with Flows
CrewAI Flows represent the next level in AI orchestration - combining the collaborative power of AI agent crews with the precision and flexibility of procedural programming. While crews excel at agent collaboration, flows give you fine-grained control over exactly how and when different components of your AI system interact. In this guide, we’ll walk through creating a powerful CrewAI Flow that generates a comprehensive learning guide on any topic. This tutorial will demonstrate how Flows provide structured, event-driven control over your AI workflows by combining regular code, direct LLM calls, and crew-based processing.What Makes Flows Powerful
Flows enable you to:- Combine different AI interaction patterns - Use crews for complex collaborative tasks, direct LLM calls for simpler operations, and regular code for procedural logic
- Build event-driven systems - Define how components respond to specific events and data changes
- Maintain state across components - Share and transform data between different parts of your application
- Integrate with external systems - Seamlessly connect your AI workflow with databases, APIs, and user interfaces
- Create complex execution paths - Design conditional branches, parallel processing, and dynamic workflows
What You’ll Build and Learn
By the end of this guide, you’ll have:- Created a sophisticated content generation system that combines user input, AI planning, and multi-agent content creation
- Orchestrated the flow of information between different components of your system
- Implemented event-driven architecture where each step responds to the completion of previous steps
- Built a foundation for more complex AI applications that you can expand and customize
- Interactive AI assistants that combine multiple specialized subsystems
- Complex data processing pipelines with AI-enhanced transformations
- Autonomous agents that integrate with external services and APIs
- Multi-stage decision-making systems with human-in-the-loop processes
Prerequisites
Before starting, make sure you have:- Installed CrewAI following the installation guide
- Set up your LLM API key in your environment, following the LLM setup guide
- Basic understanding of Python
Step 1: Create a New CrewAI Flow Project
First, let’s create a new CrewAI Flow project using the CLI. This command sets up a scaffolded project with all the necessary directories and template files for your flow.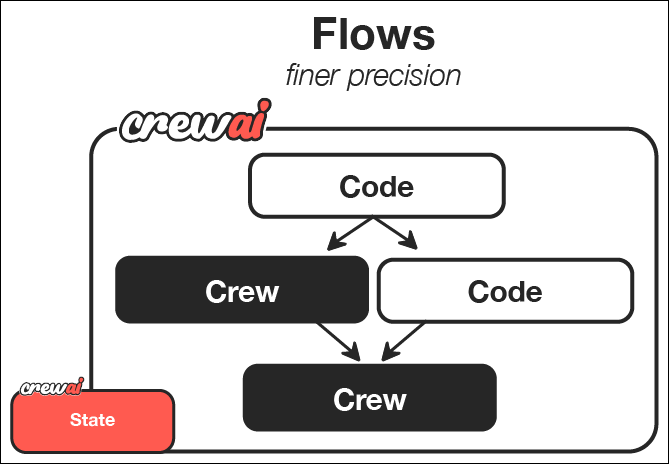
CrewAI Framework Overview
Step 2: Understanding the Project Structure
The generated project has the following structure. The starter embedded crew uses the classic Python/YAML layout, and in Step 4 we will replace the content crew with a JSONC crew.- The main flow logic in the
src/guide_creator_flow/main.pyfile - Specialized crews in the
src/guide_creator_flow/crewsdirectory - Custom tools in the
src/guide_creator_flow/toolsdirectory
Step 3: Add a Content Writer Crew
Our flow will need a specialized crew to handle the content creation process. Let’s use the CrewAI CLI to add a content writer crew:Step 4: Configure the Content Writer Crew
Now, let’s configure the content writer crew with JSONC. We’ll set up two specialized agents - a writer and a reviewer - that collaborate to create high-quality content for our guide.- Create
src/guide_creator_flow/crews/content_crew/agents/content_writer.jsonc:
- Create
src/guide_creator_flow/crews/content_crew/agents/content_reviewer.jsonc:
provider/model-id with the model you use, for example openai/gpt-4o, gemini/gemini-2.0-flash-001, or anthropic/claude-sonnet-4-6.
- Create
src/guide_creator_flow/crews/content_crew/crew.jsonc:
context field lets the reviewer use the writer’s output.
- Replace
src/guide_creator_flow/crews/content_crew/content_crew.pywith a small loader:
crew.jsonc into a Crew at runtime. While this crew can function independently, in our flow it will be orchestrated as part of a larger system.
Step 5: Create the Flow
Now comes the exciting part - creating the flow that will orchestrate the entire guide creation process. This is where we’ll combine regular Python code, direct LLM calls, and our content creation crew into a cohesive system. Our flow will:- Get user input for a topic and audience level
- Make a direct LLM call to create a structured guide outline
- Process each section sequentially using the content writer crew
- Combine everything into a final comprehensive document
main.py file:
- We define Pydantic models for structured data, ensuring type safety and clear data representation
- We create a state class to maintain data across different steps of the flow
- We implement three main flow steps:
- Getting user input with the
@start()decorator - Creating a guide outline with a direct LLM call
- Processing sections with our content crew
- Getting user input with the
- We use the
@listen()decorator to establish event-driven relationships between steps
Step 6: Set Up Your Environment Variables
Create a.env file in your project root with your API keys. See the LLM setup
guide for details on configuring a provider.
.env
Step 7: Install Dependencies
Install the required dependencies:Step 8: Run Your Flow
Now it’s time to see your flow in action! Run it using the CrewAI CLI:- It will prompt you for a topic and audience level
- It will create a structured outline for your guide
- It will process each section, with the content writer and reviewer collaborating on each
- Finally, it will compile everything into a comprehensive guide
Step 9: Visualize Your Flow
One of the powerful features of flows is the ability to visualize their structure:Step 10: Review the Output
Once the flow completes, you’ll find two files in theoutput directory:
guide_outline.json: Contains the structured outline of the guidecomplete_guide.md: The comprehensive guide with all sections
The Art of the Possible: Beyond Your First Flow
What you’ve learned in this guide provides a foundation for creating much more sophisticated AI systems. Here are some ways you could extend this basic flow:Enhancing User Interaction
You could create more interactive flows with:- Web interfaces for input and output
- Real-time progress updates
- Interactive feedback and refinement loops
- Multi-stage user interactions
Adding More Processing Steps
You could expand your flow with additional steps for:- Research before outline creation
- Image generation for illustrations
- Code snippet generation for technical guides
- Final quality assurance and fact-checking
Creating More Complex Flows
You could implement more sophisticated flow patterns:- Conditional branching based on user preferences or content type
- Parallel processing of independent sections
- Iterative refinement loops with feedback
- Integration with external APIs and services
Applying to Different Domains
The same patterns can be applied to create flows for:- Interactive storytelling: Create personalized stories based on user input
- Business intelligence: Process data, generate insights, and create reports
- Product development: Facilitate ideation, design, and planning
- Educational systems: Create personalized learning experiences
Key Features Demonstrated
This guide creator flow demonstrates several powerful features of CrewAI:- User interaction: The flow collects input directly from the user
- Direct LLM calls: Uses the LLM class for efficient, single-purpose AI interactions
- Structured data with Pydantic: Uses Pydantic models to ensure type safety
- Sequential processing with context: Writes sections in order, providing previous sections for context
- Multi-agent crews: Leverages specialized agents (writer and reviewer) for content creation
- State management: Maintains state across different steps of the process
- Event-driven architecture: Uses the
@listendecorator to respond to events
Understanding the Flow Structure
Let’s break down the key components of flows to help you understand how to build your own:1. Direct LLM Calls
Flows allow you to make direct calls to language models when you need simple, structured responses:2. Event-Driven Architecture
Flows use decorators to establish relationships between components:3. State Management
Flows maintain state across steps, making it easy to share data:4. Crew Integration
Flows can seamlessly integrate with crews for complex collaborative tasks:Next Steps
Now that you’ve built your first flow, you can:- Experiment with more complex flow structures and patterns
- Try using
@router()to create conditional branches in your flows - Explore the
and_andor_functions for more complex parallel execution - Connect your flow to external APIs, databases, or user interfaces
- Combine multiple specialized crews in a single flow
- Build multi-turn chat apps with Conversational Flows (
kickoffper message,ChatSession, deferred tracing)
Congratulations! You’ve successfully built your first CrewAI Flow that combines regular code, direct LLM calls, and crew-based processing to create a comprehensive guide. These foundational skills enable you to create increasingly sophisticated AI applications that can tackle complex, multi-stage problems through a combination of procedural control and collaborative intelligence.