Taking Control of AI Workflows with Flows
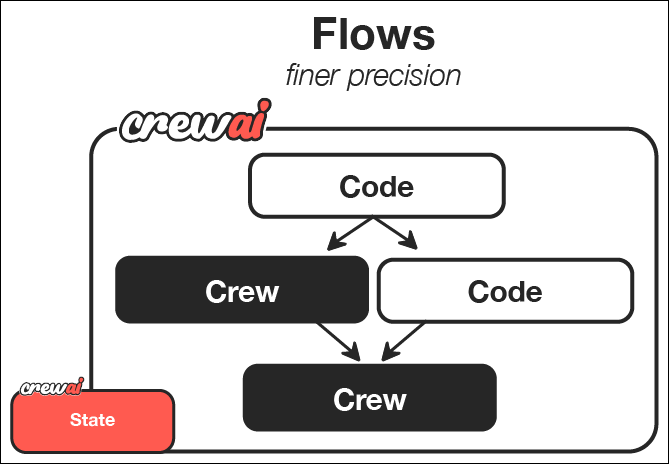
CrewAI Flows represent the next level in AI orchestration - combining the collaborative power of AI agent crews with the precision and flexibility of procedural programming. While crews excel at agent collaboration, flows give you fine-grained control over exactly how and when different components of your AI system interact.
In this guide, we’ll walk through creating a powerful CrewAI Flow that generates a comprehensive learning guide on any topic. This tutorial will demonstrate how Flows provide structured, event-driven control over your AI workflows by combining regular code, direct LLM calls, and crew-based processing.
What Makes Flows Powerful
Flows enable you to:
- Combine different AI interaction patterns - Use crews for complex collaborative tasks, direct LLM calls for simpler operations, and regular code for procedural logic
- Build event-driven systems - Define how components respond to specific events and data changes
- Maintain state across components - Share and transform data between different parts of your application
- Integrate with external systems - Seamlessly connect your AI workflow with databases, APIs, and user interfaces
- Create complex execution paths - Design conditional branches, parallel processing, and dynamic workflows
What You’ll Build and Learn
By the end of this guide, you’ll have:
- Created a sophisticated content generation system that combines user input, AI planning, and multi-agent content creation
- Orchestrated the flow of information between different components of your system
- Implemented event-driven architecture where each step responds to the completion of previous steps
- Built a foundation for more complex AI applications that you can expand and customize
This guide creator flow demonstrates fundamental patterns that can be applied to create much more advanced applications, such as:
- Interactive AI assistants that combine multiple specialized subsystems
- Complex data processing pipelines with AI-enhanced transformations
- Autonomous agents that integrate with external services and APIs
- Multi-stage decision-making systems with human-in-the-loop processes
Let’s dive in and build your first flow!
Prerequisites
Before starting, make sure you have:
- Installed CrewAI following the installation guide
- Set up your LLM API key in your environment, following the LLM setup
guide
- Basic understanding of Python
Step 1: Create a New CrewAI Flow Project
First, let’s create a new CrewAI Flow project using the CLI. This command sets up a scaffolded project with all the necessary directories and template files for your flow.
crewai create flow guide_creator_flow
cd guide_creator_flow
Step 2: Understanding the Project Structure
The generated project has the following structure. The starter embedded crew uses the classic Python/YAML layout, and in Step 4 we will replace the content crew with a JSONC crew.
guide_creator_flow/
├── .gitignore
├── pyproject.toml
├── README.md
├── .env
└── src/
└── guide_creator_flow/
├── __init__.py
├── main.py
├── crews/
│ └── poem_crew/
│ ├── config/
│ │ ├── agents.yaml
│ │ └── tasks.yaml
│ └── poem_crew.py
└── tools/
└── custom_tool.py
- The main flow logic in the
src/guide_creator_flow/main.py file
- Specialized crews in the
src/guide_creator_flow/crews directory
- Custom tools in the
src/guide_creator_flow/tools directory
We’ll modify this structure to create our guide creator flow, which will orchestrate the process of generating comprehensive learning guides.
Step 3: Add a Content Writer Crew
Our flow will need a specialized crew to handle the content creation process. Let’s use the CrewAI CLI to add a content writer crew:
crewai flow add-crew content-crew
Step 4: Configure the Content Writer Crew
Now, let’s configure the content writer crew with JSONC. We’ll set up two specialized agents - a writer and a reviewer - that collaborate to create high-quality content for our guide.
- Create
src/guide_creator_flow/crews/content_crew/agents/content_writer.jsonc:
{
"role": "Educational Content Writer",
"goal": "Create engaging, informative content that thoroughly explains the assigned topic and provides valuable insights to the reader.",
"backstory": "You are a talented educational writer who explains complex concepts in accessible language and organizes information clearly.",
"llm": "provider/model-id",
"settings": {
"verbose": true
}
}
- Create
src/guide_creator_flow/crews/content_crew/agents/content_reviewer.jsonc:
{
"role": "Educational Content Reviewer and Editor",
"goal": "Ensure content is accurate, comprehensive, well-structured, and consistent with previously written sections.",
"backstory": "You are a meticulous editor with an eye for detail, clarity, and coherence.",
"llm": "provider/model-id",
"settings": {
"verbose": true
}
}
provider/model-id with the model you use, for example openai/gpt-4o, gemini/gemini-2.0-flash-001, or anthropic/claude-sonnet-4-6.
- Create
src/guide_creator_flow/crews/content_crew/crew.jsonc:
{
"name": "Content Crew",
"agents": ["content_writer", "content_reviewer"],
"tasks": [
{
"name": "write_section_task",
"description": "Write a comprehensive section on the topic: \"{section_title}\".\n\nSection description: {section_description}\nTarget audience: {audience_level} level learners\n\nYour content should begin with a brief introduction, explain key concepts clearly with examples, include practical applications where appropriate, end with a summary, and be approximately 500-800 words.\n\nPreviously written sections:\n{previous_sections}",
"expected_output": "A well-structured, comprehensive section in Markdown format that thoroughly explains the topic and is appropriate for the target audience.",
"agent": "content_writer",
"markdown": true
},
{
"name": "review_section_task",
"description": "Review and improve this section on \"{section_title}\":\n\n{draft_content}\n\nTarget audience: {audience_level} level learners\nPreviously written sections:\n{previous_sections}\n\nFix errors, improve clarity, verify consistency, enhance structure, and add missing key information.",
"expected_output": "An improved, polished version of the section that maintains the original structure but enhances clarity, accuracy, and consistency.",
"agent": "content_reviewer",
"context": ["write_section_task"],
"markdown": true
}
],
"process": "sequential",
"verbose": true
}
context field lets the reviewer use the writer’s output.
- Replace
src/guide_creator_flow/crews/content_crew/content_crew.py with a small loader:
from pathlib import Path
from crewai.project import load_crew
def kickoff_content_crew(inputs: dict):
crew, default_inputs = load_crew(Path(__file__).with_name("crew.jsonc"))
return crew.kickoff(inputs={**default_inputs, **inputs})
crew.jsonc into a Crew at runtime. While this crew can function independently, in our flow it will be orchestrated as part of a larger system.
Step 5: Create the Flow
Now comes the exciting part - creating the flow that will orchestrate the entire guide creation process. This is where we’ll combine regular Python code, direct LLM calls, and our content creation crew into a cohesive system.
Our flow will:
- Get user input for a topic and audience level
- Make a direct LLM call to create a structured guide outline
- Process each section sequentially using the content writer crew
- Combine everything into a final comprehensive document
Let’s create our flow in the main.py file:
#!/usr/bin/env python
import json
import os
from typing import List, Dict
from pydantic import BaseModel, Field
from crewai import LLM
from crewai.flow.flow import Flow, listen, start
from guide_creator_flow.crews.content_crew.content_crew import kickoff_content_crew
# Define our models for structured data
class Section(BaseModel):
title: str = Field(description="Title of the section")
description: str = Field(description="Brief description of what the section should cover")
class GuideOutline(BaseModel):
title: str = Field(description="Title of the guide")
introduction: str = Field(description="Introduction to the topic")
target_audience: str = Field(description="Description of the target audience")
sections: List[Section] = Field(description="List of sections in the guide")
conclusion: str = Field(description="Conclusion or summary of the guide")
# Define our flow state
class GuideCreatorState(BaseModel):
topic: str = ""
audience_level: str = ""
guide_outline: GuideOutline = None
sections_content: Dict[str, str] = {}
class GuideCreatorFlow(Flow[GuideCreatorState]):
"""Flow for creating a comprehensive guide on any topic"""
@start()
def get_user_input(self):
"""Get input from the user about the guide topic and audience"""
print("\n=== Create Your Comprehensive Guide ===\n")
# Get user input
self.state.topic = input("What topic would you like to create a guide for? ")
# Get audience level with validation
while True:
audience = input("Who is your target audience? (beginner/intermediate/advanced) ").lower()
if audience in ["beginner", "intermediate", "advanced"]:
self.state.audience_level = audience
break
print("Please enter 'beginner', 'intermediate', or 'advanced'")
print(f"\nCreating a guide on {self.state.topic} for {self.state.audience_level} audience...\n")
return self.state
@listen(get_user_input)
def create_guide_outline(self, state):
"""Create a structured outline for the guide using a direct LLM call"""
print("Creating guide outline...")
# Initialize the LLM
llm = LLM(model="openai/gpt-4o-mini", response_format=GuideOutline)
# Create the messages for the outline
messages = [
{"role": "system", "content": "You are a helpful assistant designed to output JSON."},
{"role": "user", "content": f"""
Create a detailed outline for a comprehensive guide on "{state.topic}" for {state.audience_level} level learners.
The outline should include:
1. A compelling title for the guide
2. An introduction to the topic
3. 4-6 main sections that cover the most important aspects of the topic
4. A conclusion or summary
For each section, provide a clear title and a brief description of what it should cover.
"""}
]
# Make the LLM call with JSON response format
response = llm.call(messages=messages)
# Parse the JSON response
outline_dict = json.loads(response)
self.state.guide_outline = GuideOutline(**outline_dict)
# Ensure output directory exists before saving
os.makedirs("output", exist_ok=True)
# Save the outline to a file
with open("output/guide_outline.json", "w") as f:
json.dump(outline_dict, f, indent=2)
print(f"Guide outline created with {len(self.state.guide_outline.sections)} sections")
return self.state.guide_outline
@listen(create_guide_outline)
def write_and_compile_guide(self, outline):
"""Write all sections and compile the guide"""
print("Writing guide sections and compiling...")
completed_sections = []
# Process sections one by one to maintain context flow
for section in outline.sections:
print(f"Processing section: {section.title}")
# Build context from previous sections
previous_sections_text = ""
if completed_sections:
previous_sections_text = "# Previously Written Sections\n\n"
for title in completed_sections:
previous_sections_text += f"## {title}\n\n"
previous_sections_text += self.state.sections_content.get(title, "") + "\n\n"
else:
previous_sections_text = "No previous sections written yet."
# Run the content crew for this section
result = kickoff_content_crew(inputs={
"section_title": section.title,
"section_description": section.description,
"audience_level": self.state.audience_level,
"previous_sections": previous_sections_text,
"draft_content": ""
})
# Store the content
self.state.sections_content[section.title] = result.raw
completed_sections.append(section.title)
print(f"Section completed: {section.title}")
# Compile the final guide
guide_content = f"# {outline.title}\n\n"
guide_content += f"## Introduction\n\n{outline.introduction}\n\n"
# Add each section in order
for section in outline.sections:
section_content = self.state.sections_content.get(section.title, "")
guide_content += f"\n\n{section_content}\n\n"
# Add conclusion
guide_content += f"## Conclusion\n\n{outline.conclusion}\n\n"
# Save the guide
with open("output/complete_guide.md", "w") as f:
f.write(guide_content)
print("\nComplete guide compiled and saved to output/complete_guide.md")
return "Guide creation completed successfully"
def kickoff():
"""Run the guide creator flow"""
GuideCreatorFlow().kickoff()
print("\n=== Flow Complete ===")
print("Your comprehensive guide is ready in the output directory.")
print("Open output/complete_guide.md to view it.")
def plot():
"""Generate a visualization of the flow"""
flow = GuideCreatorFlow()
flow.plot("guide_creator_flow")
print("Flow visualization saved to guide_creator_flow.html")
if __name__ == "__main__":
kickoff()
- We define Pydantic models for structured data, ensuring type safety and clear data representation
- We create a state class to maintain data across different steps of the flow
- We implement three main flow steps:
- Getting user input with the
@start() decorator
- Creating a guide outline with a direct LLM call
- Processing sections with our content crew
- We use the
@listen() decorator to establish event-driven relationships between steps
This is the power of flows - combining different types of processing (user interaction, direct LLM calls, crew-based tasks) into a coherent, event-driven system.
Step 6: Set Up Your Environment Variables
Create a .env file in your project root with your API keys. See the LLM setup
guide for details on configuring a provider.
OPENAI_API_KEY=your_openai_api_key
# or
GEMINI_API_KEY=your_gemini_api_key
# or
ANTHROPIC_API_KEY=your_anthropic_api_key
Step 7: Install Dependencies
Install the required dependencies:
Step 8: Run Your Flow
Now it’s time to see your flow in action! Run it using the CrewAI CLI:
When you run this command, you’ll see your flow spring to life:
- It will prompt you for a topic and audience level
- It will create a structured outline for your guide
- It will process each section, with the content writer and reviewer collaborating on each
- Finally, it will compile everything into a comprehensive guide
This demonstrates the power of flows to orchestrate complex processes involving multiple components, both AI and non-AI.
Step 9: Visualize Your Flow
One of the powerful features of flows is the ability to visualize their structure:
This will create an HTML file that shows the structure of your flow, including the relationships between different steps and the data that flows between them. This visualization can be invaluable for understanding and debugging complex flows.
Step 10: Review the Output
Once the flow completes, you’ll find two files in the output directory:
guide_outline.json: Contains the structured outline of the guidecomplete_guide.md: The comprehensive guide with all sections
Take a moment to review these files and appreciate what you’ve built - a system that combines user input, direct AI interactions, and collaborative agent work to produce a complex, high-quality output.
The Art of the Possible: Beyond Your First Flow
What you’ve learned in this guide provides a foundation for creating much more sophisticated AI systems. Here are some ways you could extend this basic flow:
Enhancing User Interaction
You could create more interactive flows with:
- Web interfaces for input and output
- Real-time progress updates
- Interactive feedback and refinement loops
- Multi-stage user interactions
Adding More Processing Steps
You could expand your flow with additional steps for:
- Research before outline creation
- Image generation for illustrations
- Code snippet generation for technical guides
- Final quality assurance and fact-checking
Creating More Complex Flows
You could implement more sophisticated flow patterns:
- Conditional branching based on user preferences or content type
- Parallel processing of independent sections
- Iterative refinement loops with feedback
- Integration with external APIs and services
Applying to Different Domains
The same patterns can be applied to create flows for:
- Interactive storytelling: Create personalized stories based on user input
- Business intelligence: Process data, generate insights, and create reports
- Product development: Facilitate ideation, design, and planning
- Educational systems: Create personalized learning experiences
Key Features Demonstrated
This guide creator flow demonstrates several powerful features of CrewAI:
- User interaction: The flow collects input directly from the user
- Direct LLM calls: Uses the LLM class for efficient, single-purpose AI interactions
- Structured data with Pydantic: Uses Pydantic models to ensure type safety
- Sequential processing with context: Writes sections in order, providing previous sections for context
- Multi-agent crews: Leverages specialized agents (writer and reviewer) for content creation
- State management: Maintains state across different steps of the process
- Event-driven architecture: Uses the
@listen decorator to respond to events
Understanding the Flow Structure
Let’s break down the key components of flows to help you understand how to build your own:
1. Direct LLM Calls
Flows allow you to make direct calls to language models when you need simple, structured responses:
llm = LLM(
model="model-id-here", # gpt-4o, gemini-2.0-flash, anthropic/claude...
response_format=GuideOutline
)
response = llm.call(messages=messages)
2. Event-Driven Architecture
Flows use decorators to establish relationships between components:
@start()
def get_user_input(self):
# First step in the flow
# ...
@listen(get_user_input)
def create_guide_outline(self, state):
# This runs when get_user_input completes
# ...
3. State Management
Flows maintain state across steps, making it easy to share data:
class GuideCreatorState(BaseModel):
topic: str = ""
audience_level: str = ""
guide_outline: GuideOutline = None
sections_content: Dict[str, str] = {}
4. Crew Integration
Flows can seamlessly integrate with crews for complex collaborative tasks:
result = kickoff_content_crew(inputs={
"section_title": section.title,
# ...
})
Next Steps
Now that you’ve built your first flow, you can:
- Experiment with more complex flow structures and patterns
- Try using
@router() to create conditional branches in your flows
- Explore the
and_ and or_ functions for more complex parallel execution
- Connect your flow to external APIs, databases, or user interfaces
- Combine multiple specialized crews in a single flow
- Build multi-turn chat apps with Conversational Flows (
kickoff per message, ChatSession, deferred tracing)
Congratulations! You’ve successfully built your first CrewAI Flow that combines regular code, direct LLM calls, and crew-based processing to create a comprehensive guide. These foundational skills enable you to create increasingly sophisticated AI applications that can tackle complex, multi-stage problems through a combination of procedural control and collaborative intelligence.