Setup Process
1
Access Azure AI Foundry
- In Azure, go to Azure AI Foundry > select your Azure OpenAI deployment.
- On the left menu, click
Deployments. If you don’t have one, create a deployment with your desired model. - Once created, select your deployment and locate the
Target URIandKeyon the right side of the page. Keep this page open, as you’ll need this information.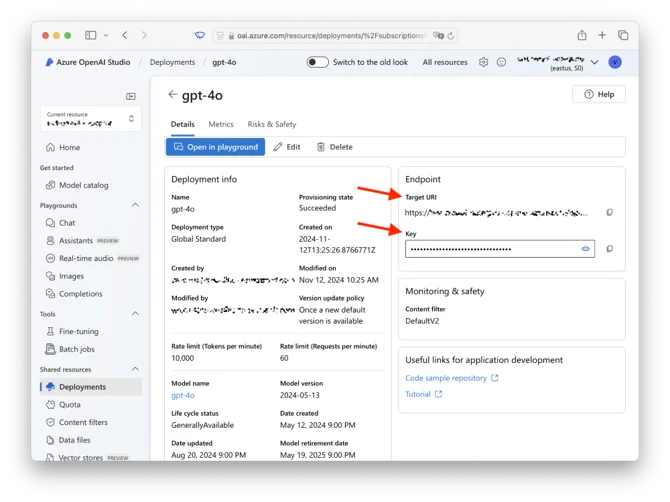
2
Configure CrewAI AMP Connection
- In another tab, open
CrewAI AMP > LLM Connections. Name your LLM Connection, select Azure as the provider, and choose the same model you selected in Azure. - On the same page, add environment variables from step 3:
- One named
AZURE_DEPLOYMENT_TARGET_URL(using the Target URI). The URL should look like this: https://your-deployment.openai.azure.com/openai/deployments/gpt-4o/chat/completions?api-version=2024-08-01-preview - Another named
AZURE_API_KEY(using the Key).
- One named
- Click
Add Connectionto save your LLM Connection.
3
Set Default Configuration
- In
CrewAI AMP > Settings > Defaults > Crew Studio LLM Settings, set the new LLM Connection and model as defaults.
4
Configure Network Access
- Ensure network access settings:
- In Azure, go to
Azure OpenAI > select your deployment. - Navigate to
Resource Management > Networking. - Ensure that
Allow access from all networksis enabled. If this setting is restricted, CrewAI may be blocked from accessing your Azure OpenAI endpoint.
- In Azure, go to
Verification
You’re all set! Crew Studio will now use your Azure OpenAI connection. Test the connection by creating a simple crew or task to ensure everything is working properly.Troubleshooting
If you encounter issues:- Verify the Target URI format matches the expected pattern
- Check that the API key is correct and has proper permissions
- Ensure network access is configured to allow CrewAI connections
- Confirm the deployment model matches what you’ve configured in CrewAI